Hello everyone!
Today I am super excited to share something we’ve been working on internally for quite a long time. We are introducing a new way to work with Reach – a Bluetooth Low Energy connection. This is an alternative connection type built right into ReachView 3.
Why use BLE?
Ease of use
One of the best features of the new BLE connection is that it’s dead simple to use. No client/hotspot modes, no pairing is required. You don’t need to remember what mode your Reach is in, just scan and connect.
New NTRIP over BLE correction input
No need to share Internet connection to your Reach. Use your phone’s mobile data to pass the NTRIP corrections to the receiver. It’s super easy!
It saves phone battery compared to using your phone as a hotspot. It’s a great workaround for countries where 3G is being taken down. Also, if you’ve had trouble using mobile data on your Android phone in Reach hotspot, that’s not going to be an issue with BLE.
NTRIP over BLE is available when you connect via BLE just like any other correction option. You can use your NTRIP profiles just like you do with the regular NTRIP connections.

How to activate BLE
-
BLE is available on Reach RS2 and Reach RS+. You’ll need to upgrade your Reach RS2 or Reach RS+ to the latest beta firmware. 29 Beta 1, 29 Beta 2, and any future betas will work fine.
-
Go to Google Play or App Store and make sure you have the latest version of ReachView 3 installed. It’s good to have automatic app updates enabled, as we’re shipping new functionality regularly.
-
To enable BLE on ReachView 3 side, you need to find a secret switch. Well, not so secret anymore, but still
 . To find that switch you need to tap on the profile icon in the bottom right corner really fast about 10 times (until the menu appears).
 -
After you activate the BLE switch, reopen ReachView 3 and give the app Bluetooth permissions (it will ask for location permissions on Android).

Easily switch between BLE and WiFi
Once you’ve activated the secret switch, Reach RS2 and Reach RS+ will be available via both BLE and Wi-Fi, so you can just pick the preferred connection mode in the scanner. It may be useful, since logging and some of the settings are not available over BLE yet. Downloading logs will always work through Wi-Fi only.
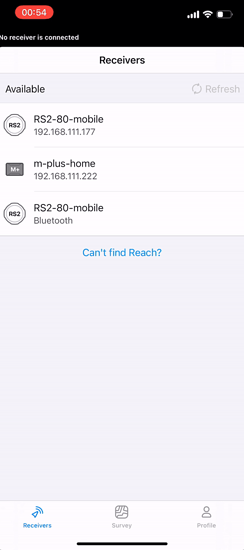
In the example below, I’ve scanned the same Reach over both Wi-Fi and BLE. If you pick the one with IP address under the name, it’ll be a Wi-Fi connection, the one with “Bluetooth” under the name is the BLE connection.
How you can help us with this Beta
Well, just give it a try! Remember, this is in beta, so we do not recommend using it for actual work.
If there’s something you like or don’t like, leave a comment in this thread. Your feedback will help us release this to a wider audience. It’s also really helpful if you share diagnostics with us, here’s how to do that:

Best regards,
Emlid team


