


EZSurv software suggested that we should keep the log file for at least 30 minutes to ensure we can achieve FIX solution.
Maybe they meant allowing the base receiver to stabilize and average the initial point? The fix should occur almost immediately with the rover/drone after that has taken place. In my opinion it takes about 10-15 minutes for this to occur on a consistent basis.
No, you should turn on DJI Phantom, wait 1-2 minutes, then go to fly.
After fly you may turn off DJI Phantom at once.
1 Like
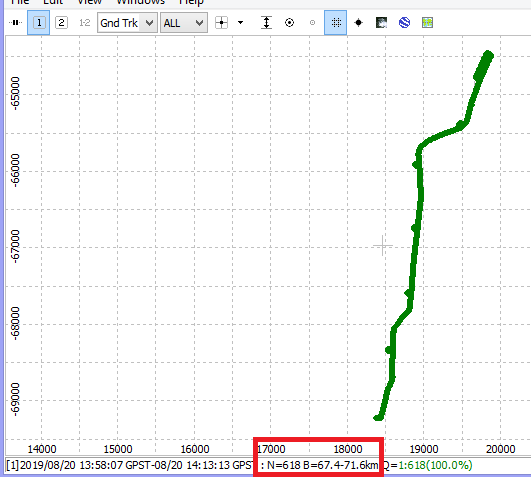
Our customer screenshot.
Setup:
Teokit
Reach m+ ( GPS + GLONASS 5Hz )
Baseline is 70 km ! Base raw data 1 Hz.

1 Like
Nice work. The image adjustments look consistent to what we have been getting with GCP’s and the GCP values should be spot on so it looks like you have it dialed in!
1 Like
@l3technologycambodia
EZsurv As elsewhere GNSS solutions use a different algorithm of that of RTKLIB for a single frequency receiver L1 and in static mode the minimum observation time is 15 minutes by adding 5 minutes for each 1 km (baseline)
Example: a baseline of 3 km requires an observation of 15 minutes minimum
a baseline of 5 km requires an observation of 25 minutes minimum
a baseline of 8 km requires a 40 minutes observation etc.
With the kinematic bar it is possible to make an observation of only 5 minutes and start a survey knowing that this one measures 20 cm and that the base and rover have the same altitude (old method for topographic surveys)
while with RTKLIB in static or kinematic mode it is possible to reach a centimetric accuracy (fix status) at least 5 minutes depending on some parameters of course.
1 Like
Hi everybody.
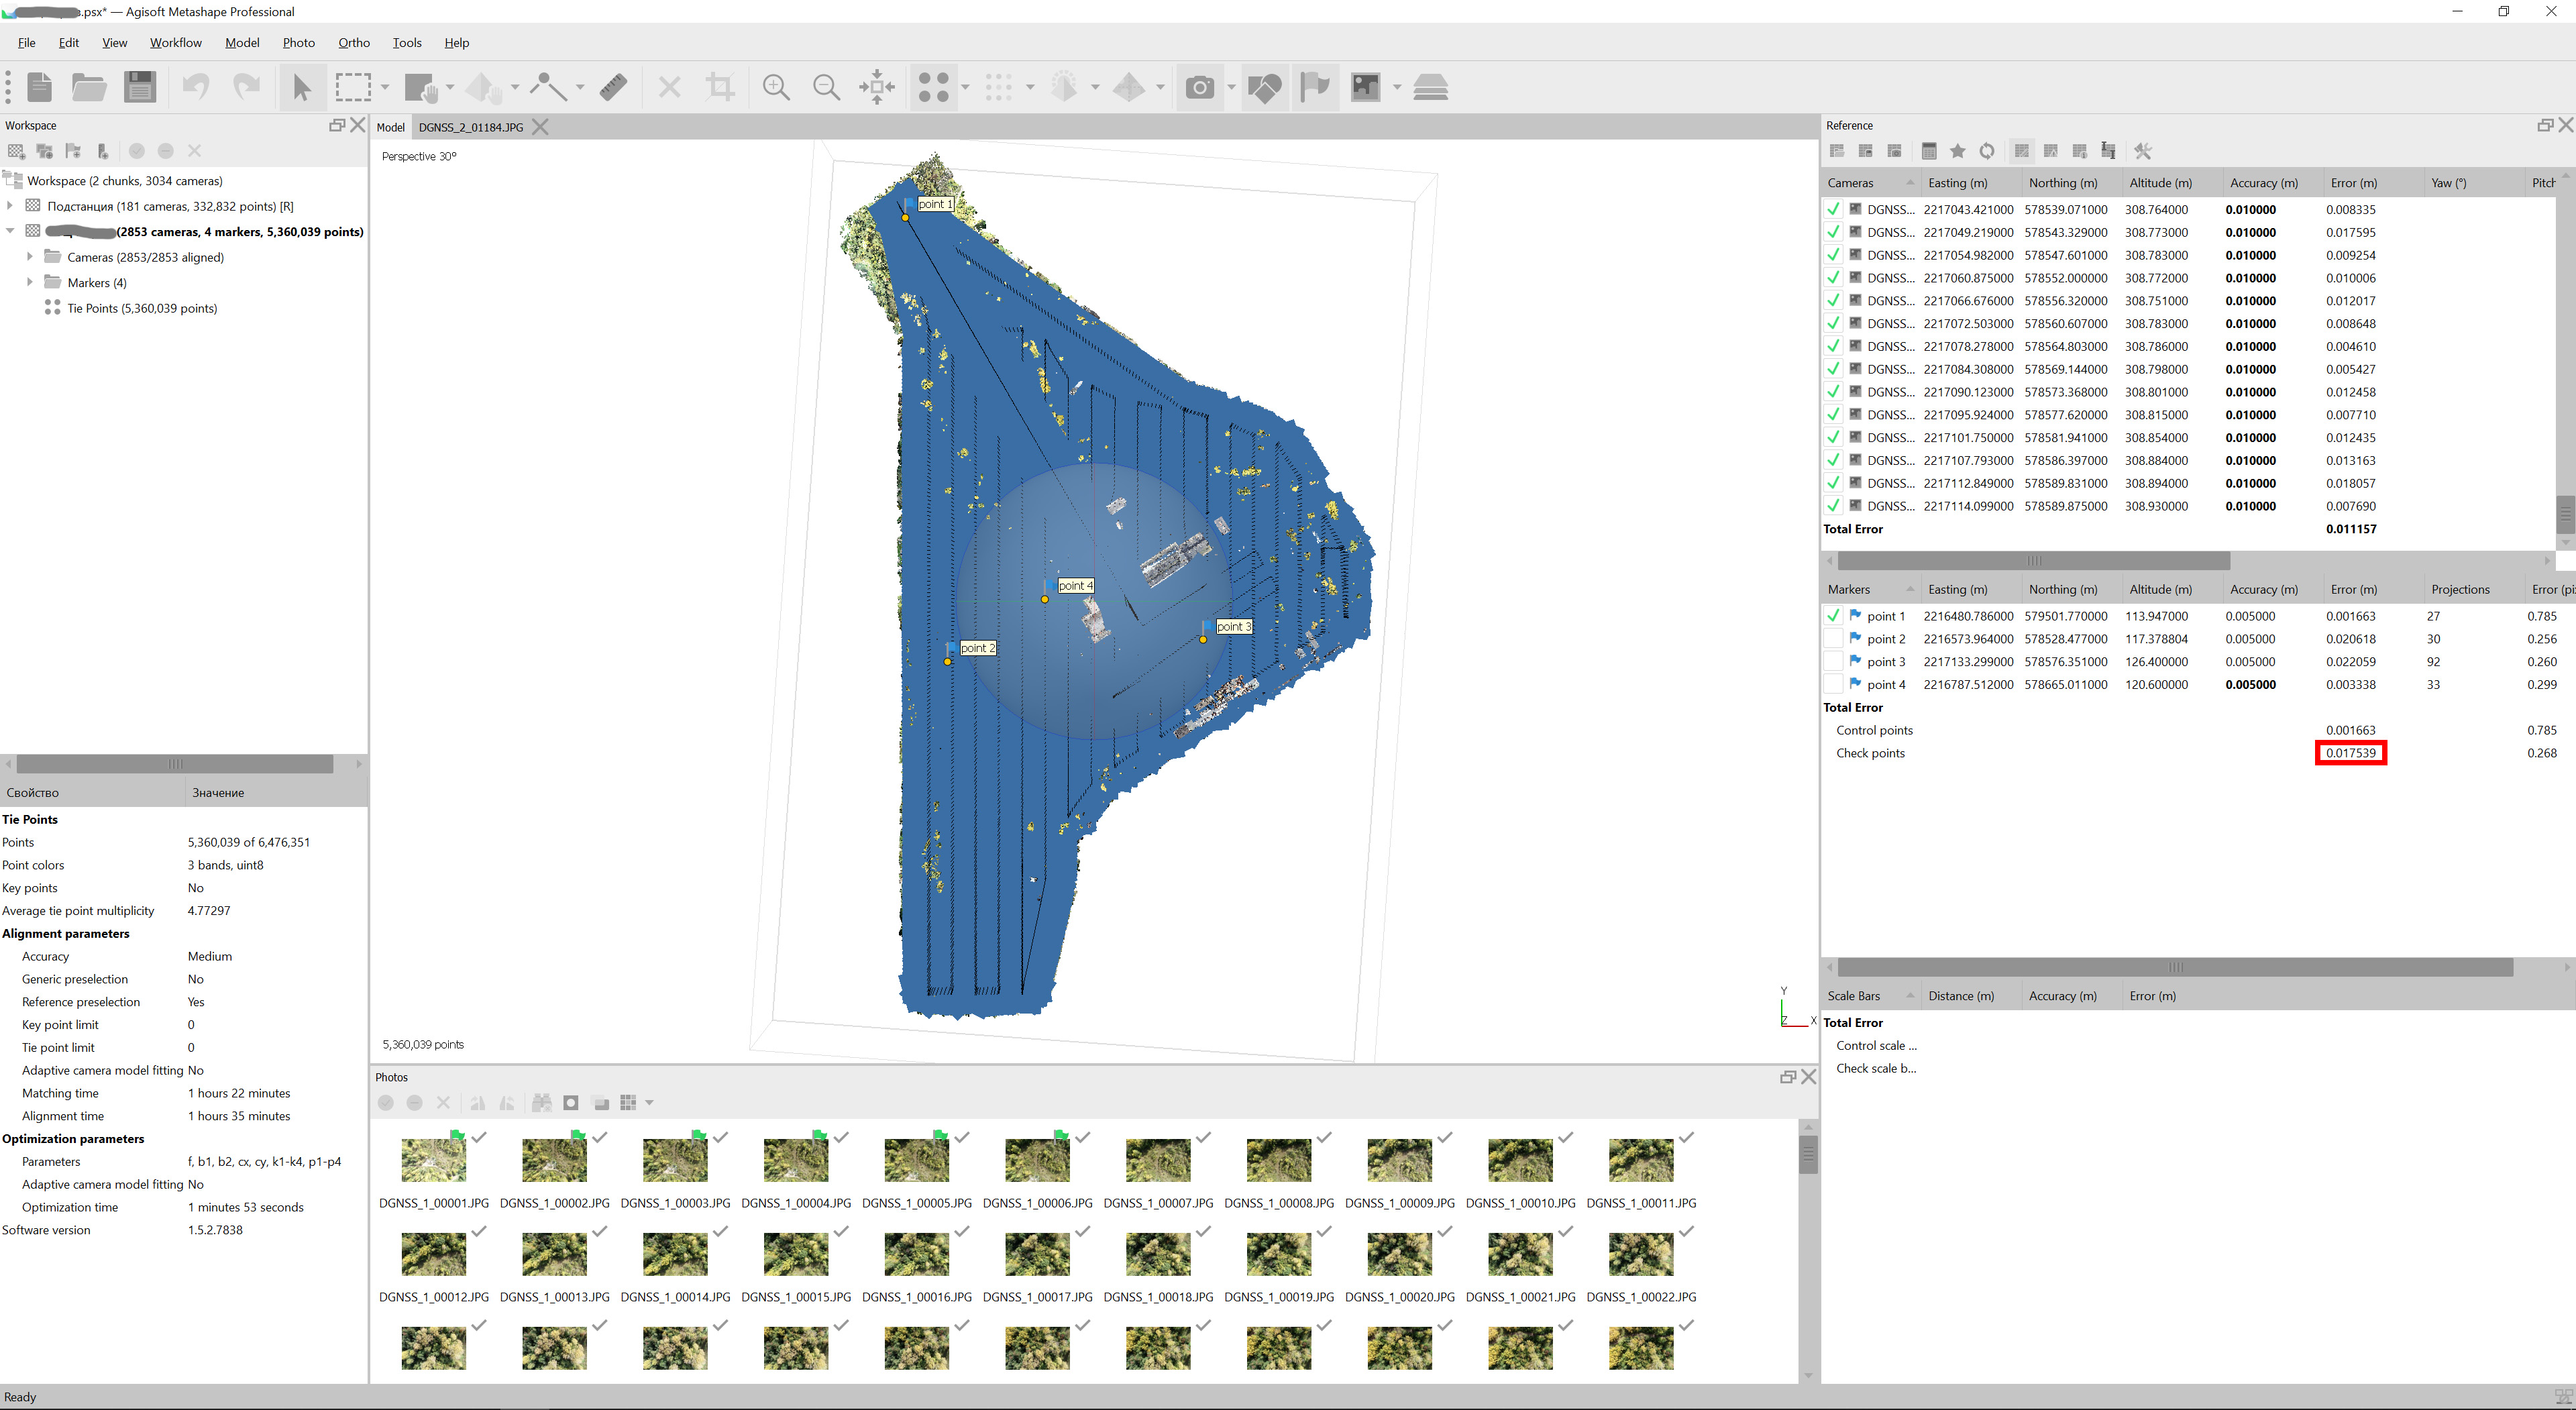
Teokit customer screenshot.
Flight height is 100m. Base is near take-off place.
Optimization for one GCP only.
GNSS board is Emlid Reach M+.
1 Like
Those are some impressive numbers. You got my interest.
Can you post the same data-set/screenshot, but with accuracy of the PPK points set to a more realistic 5 cm (and not 1 cm), and then have the Errors pane selected, so all the errors can be seen, and not just the combined ones?
3 Likes
Hi, thanks.
Surveyor already made this test, but he set 10m PPK points accuracy.
Result is very good, the same as 1 cm accuracy.
I asked him to make screenshot with English language interface.
Waiting for him.
2 Likes
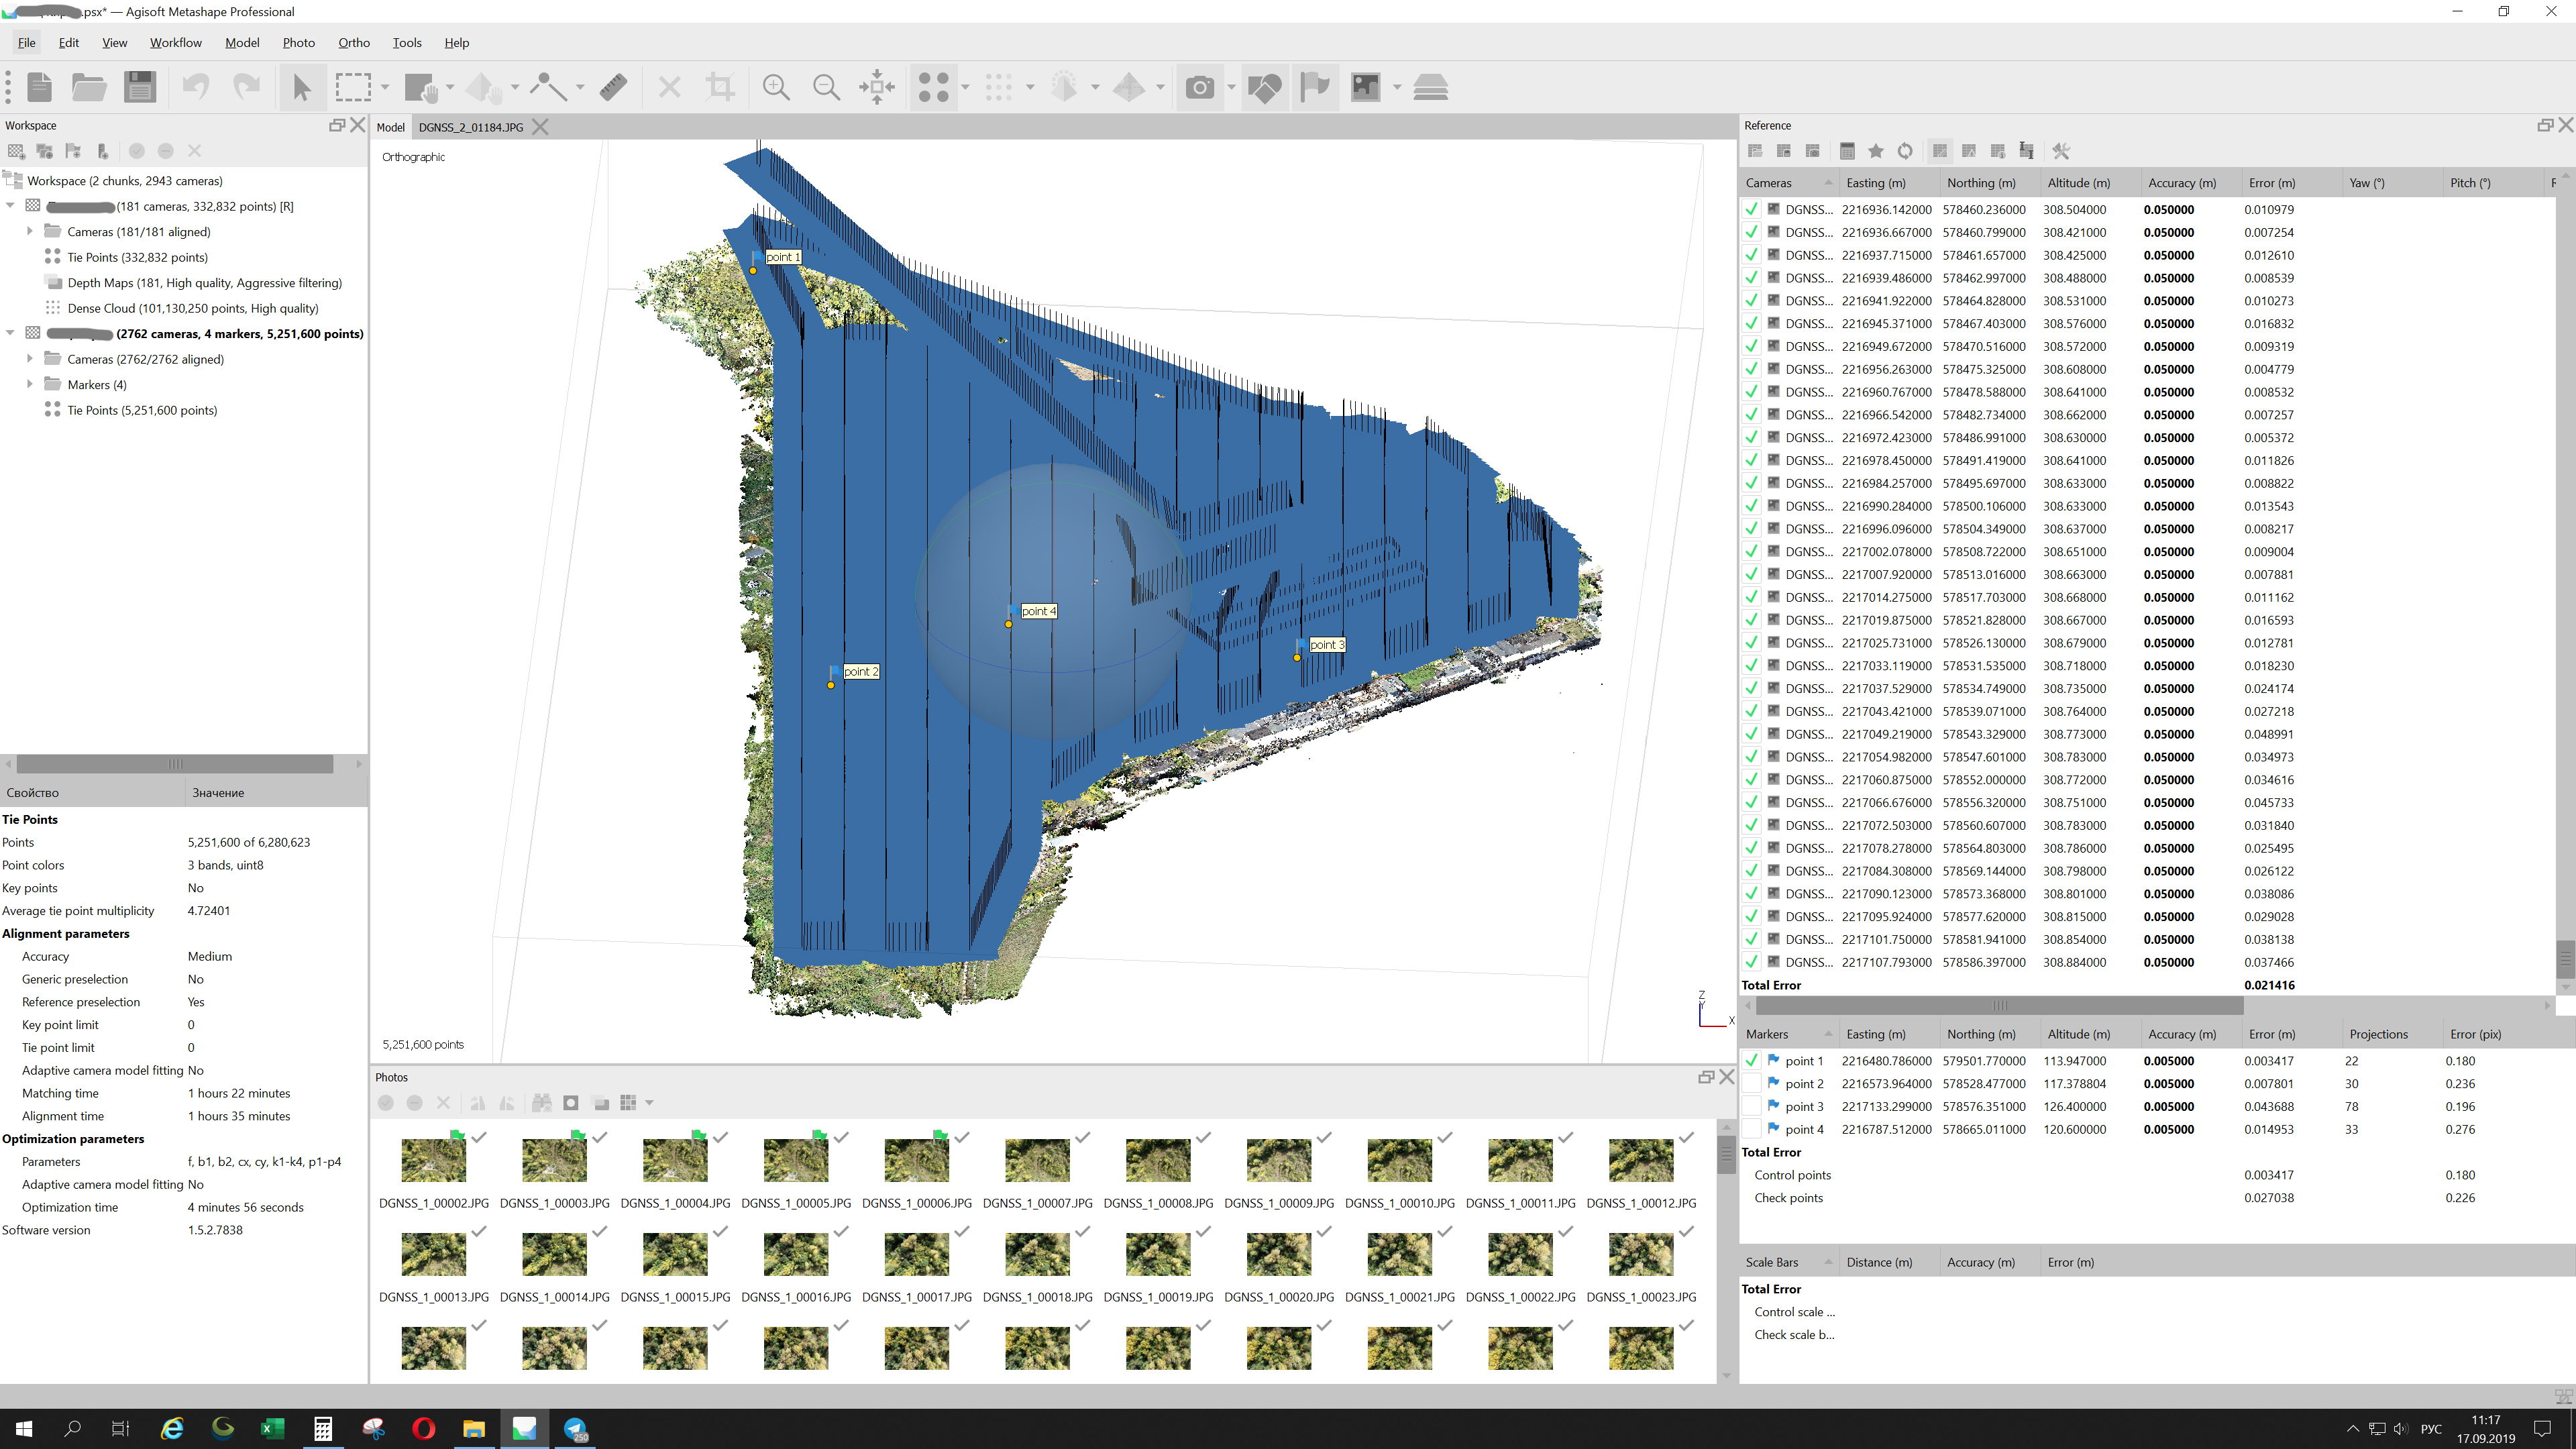
A lot of Teokit customers get great result of surveying.
Please see another screenshot:
130m flight height, Reach m+ 5 hz gps+glonass. Base (10 hz) is near the flight.
2 Likes
Howdy, so I bought the full teokit and about to install it. I’ve read through several manuals and this whole thread and still have a couple questions.
-
I’ve been using Drone Deploy to just do my flights do post processing. From reading here it looks like Litchi would be better. So would steps be, A. Plan Flight, B. Drone flies off. C. When drone starts path start the ashot board taking at 1.2 second intervals? And then use the teobox software to correct for tilt and all that.
-
I’ve been using WebODM from all my post processing. I built a computer with 128GB of ram and do 800-1000 pictures no problem.
Question here is once I fly with the Teokit installed and board taking all the pictures at 1.2 second intervals, does WebODM do the rest, now with just better information in the tags? No GCPs just better accuracy. -
Do I have the have my eMlid rs+ base set up and talking to the M+ on board the drone? And if so do I have to set the base over a known point?
I do work in alot of subdivisions, getting topos for new phases or existing lots so that architects can design the homes. My goal is to provide as accurate as possible results without tons and tons of added work.
Thanks so much, I’ll share my data and flights once I get up and running
Thanks!
1 Like
Great projects, keep us informed of how easy / difficult it is to install the module. I must admit it is a bit scary to open a P4 , unsolder wire, re-solder, etc… I use to build drones, but this looks more like modify a Iphone !
I don’t have the kit, but I’m considering it, and thus have went through the site.
You decide if you want to use the built-in timer-trigger or you just use the DroneDeploy app or likewise as usual. You only need the auto-trigger if using I.e. litchi.
Correct.
That depends, but it does not need to send correction to the M+. You have to post process the data anyhow.
Known point is only required if you absolute precision. If only relative accuracy, you just start collecting from any point close.
1 Like
Pascal, all the video and high quality images give me the confidence I need to give it a try.
The out come look worth the risk.
Wizprod.
-
So which would provide higher accuracy, using app like drone Deploy with it’s own trigger? Or Litchi and activating the trigger on the ashot board?
-
I’ve been very confused when people say post processing. So maybe this question will help some others as well.
A. When I fly drone, use whatever app to take pictures and gps data tagging, then the “Post Processing” in this case is all done by WebODM (or whatever program of choose like drone Deploy, pix4d etc).
B. What about when I have a base set up and a rover and I’m riding the site on a 4wheeler let’s say. I get all this raw data, no pictures, what software can I use to “Post Process” the emlid rs+ rover data?
PPK with drone seems like whatever software I choose, but I’m confused on the PPK of rover and base so I’m confused altogether. Lol
Thanks for your help
When installing the kit there is no need to cut the wire))
Hi, accuracy will the same, but with Litchi you can shot more square, because you can make route 55/85% and use AShot to make shots every 1.7s without missing of photos.
PPK means you need use PPK software like RTKpost, Magnet tools or Trimble BC to calculate exact centre of shots.
RTKLib for example
Hello Konstantin,
Do you know where I can purchase an antenna cable that is made with correct ends to connect spiral antenna to emlid reach M+?
Hi, for example you could use this cable:
Waiting to watch video tutorials on how to do the intergration…