


Not everything they ask for a Surveyor (AGRIMENSOR) is necessary.
Stakeout and Stakeout of lines.
IT’S ENOUGH
1 Like
Thanks Kseniia!!
I think it is very important that they supplement the reach application, the most important thing is data collection with code. They have that, if you can have an automatic take by time or unevenness it would be a great help.
The replateo of points, it helps a lot to put the nearest.
Layout of lines, by distance and by separation.
Setting out of MDT, and dimension dragging.
And for requesting a slope stakeout by 3D lines, it would be wonderful.
I say this for those of us who will not be able to work with third-party applications when they turn off 2 and 3 G.
1 Like
Hi,
I concur with this - we used the real-time grid coordinates all the time during setting out of projects and the update really restricts us.
Any modification to see the local grid coordinates and elevations would be great!
Thanks
3 Likes
lo basico seria: calculo de distancias entre puntos, calculo de superficie de poligonos, replanteo de lineas, replanteo de puntos, que manejara archivos CAD para replanteo, que el archivo CSV tuviera tambien las coordenadas planas de acuerdo a la altura geoidal, algunas herramientas COGO.
Progress in simplifying field work is welcome. The stakeout option is very useful and the data collection interface significantly improves the interface. I leave some comments for improvement in case they are useful to the developers:
- It would be interesting if the codes of the points that are entered by hand were saved and could be selected from a list instead of typing them each time.
-
I think that something simple that would add great value to the application is to be able to load the satellite view from a server such as google, esri or others. This view allows you to orientate yourself better in the field.
-
As for entering data into the app for location and referencing, it would help to be able to load an orthoimage in geotiff or ecw that is downloaded to the device or a SHP of lines or polygons (which could change the line and fill formats to be able to differentiate the elements). This is very useful if you want to load a projected infrastructure for checking or stakeout or if you are supporting a photogrammetric flight in case you want to load the boundary of the flight plot or the flight route.
Thank you
6 Likes
I add the answers to the questions raised
-
What is the first thing you do when you arrive on site? Orient my position on the ground on a satellite image to establish the point where the reference will be located if it is used and decide what is the boundary of the work and where to start.
-
What steps are involved in preparing for the survey? Establish the order of registration of points and breaklines necessary for the subsequent creation of the terrain.
-
What needs to be done during the survey? Reading points and assigning them a code that allows in gabite to draw the breaklines of the terrain and to define the cartographic elements.
-
What are the points that are collected: trees, corners of buildings, location of cables, etc.? trees, building, ditch, head of slope, foot of slope, masonry, manhole, street lamp, fill, break line, kerb, road, path, well, scupper, collector, etc. depending on the project, the list of codes will be one or the other. I should point out that although other teams have code lists, I normally use my own code lists that I adapt to each job.
-
What values do you need to see before and during point collection? The topographical location of a putno, whether it is a break line, fill point, etc. and the significance in plan, whether it is a road edge, collector, kerb, pavement, etc.
-
What values would be useful, but not necessary? Modification of designed elements during stakeout, sometimes data is modified in the field during stakeout that modifies the design, I find this useful but rarely necessary.
-
How do you plan to use the survey results? For mapping both DTMs of the terrain and existing built elements. Also for obtaining coordinates of support points for photogrammetric flights.
-
What are the requirements for the final result you obtain? Precise coordinates with an appropriate associated code.
11 Likes
Thanks for the latest update, we really appreciate the improved survey tools.
But is there any option to get back the straight-line distance from rover to choosen point?
We lay components of a seal control system in a grid pattern on a surface and have been using this function all the time.
Since the update our installation performance severly slowed down.
Is there any chance to downgrade the android app?
We crucially need the “direct-distance” function!
An Option to choose between both display types would be perfect!
Apart from that we are totally enthusiastic about the whole emlid sytem, really really a great job which (before the update) simplifies our daily work a lot!
Thank you!
5 Likes
Hello everyone…
Is there a possibility to add a battery percentage rather than a battery icon only to help us know the actual power left…
Also thank you Emlid for the latest RV 7.7
UPDATE… Very helpful…
Mon
4 Likes
update is not good. they remove the stakeout distance and the coordinate display
3 Likes
hi
i have been using emlids rs+ since 2017 here in new zealand with great results and
have now upgraded to the rs2 to a while to get it to work (without blootooth,as this was the cause of it not connecting ) just updated reach 3 . what have you done with the coordinates at the bottom of the screen . i need these to do RL CHECKS and coordinte checks .
(i take it your designer is not a surveyor ) if you cant reistate them in the next update ,looks like i will have to look into using field genuis for android and forget about reach 3
as a surveyor i cant use it on the field anymore .
2 Likes
Guys,
Our main goal is to make ReachView 3 convenient for you. So, I’m here to say both the real-time coordinates and stakeout distance will return to the app soon. Our devs are actively working on it now. I’ll write an update in this thread once it is out.
As for all the other requests, I’ve shared them with the team. Many of these features, like COGO, feature codes, and map layers support, are already in our roadmap. Of course, it can take some time to research and implement everything. But stay tuned, and you’ll surely see more features getting their way to ReachView 3!
11 Likes
Hi Manuel,
Thank you for answering my questions so thoroughly! And it’s cool to know why exactly feature codes and other backgrounds, such as satellite views or orthophotos, would be helpful for you. As I said above, both features are in the ReachView 3 roadmap. But looking into exact workflows where they are needed helps us implement them in the best way.
2 Likes
Hi @rbbarral,
Passed the request to the team! Just wanted to add that if it’s crucial for you, you can check the exact battery state in the Reach Panel web interface. To open Reach Panel, tap the receiver’s name in ReachView 3. Then, you can open the Battery status panel by tapping the battery icon:

Still, Reach Panel lacks many handy ReachView 3 features, such as coordinate system support or Base shift. So, we recommend sticking to ReachView 3 for your surveys.
2 Likes
Thanks for the feedback. That’s actually what I’m doing…just noted that a full charge in RV3 is not the same in reach panel…
Also is it possible to have a tone when it gets fix or otherwise…
Thanks again Emlid team…
Mon
1 Like
Dear all,
I found a workaround which might be useful for other users so I want to share it.
For the workaround I am using the “old” display direktly on the GPS-device. You can acccess it from the ReachView3 App by touching longer on the emlid device you want to work with and choose REACH PANEL.
Your Browser will open and you are now directly ON the Device. You can navigate to “Survey” and have to add a new Project. Then you can import Coordinates which you want to stake out. Please notice that these have to be in lat/long (geographic coordinates). Or you also can measure points manually.
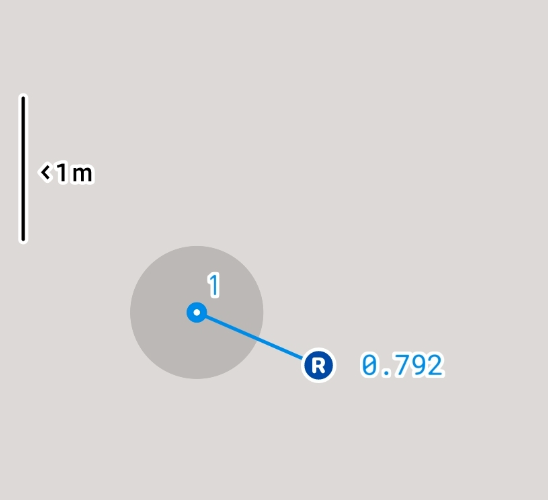
Afterwards you can click on the point and select “stake out” and you will get the good old display with the direct distance. ![]()
Hi everyone,
The new ReachView 3 7.9 with real-time coordinates and distance in the Stakeout mode is out for iOS and Android ![]()
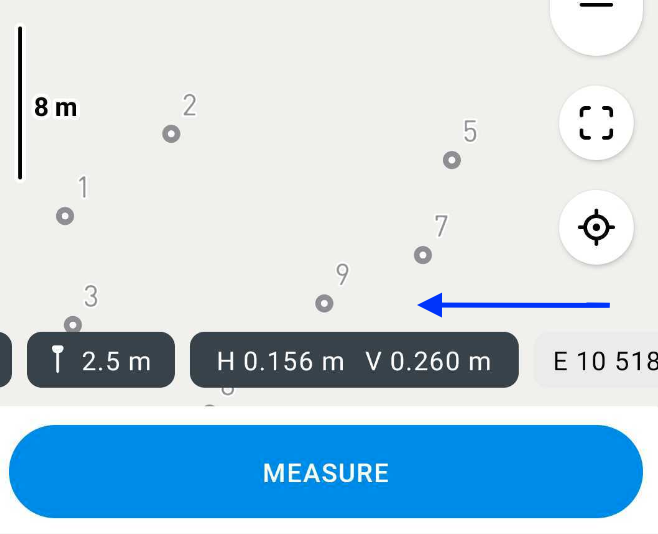
To check the real-time coordinates in Collector, swipe the tab above the bottom sheet to the left:
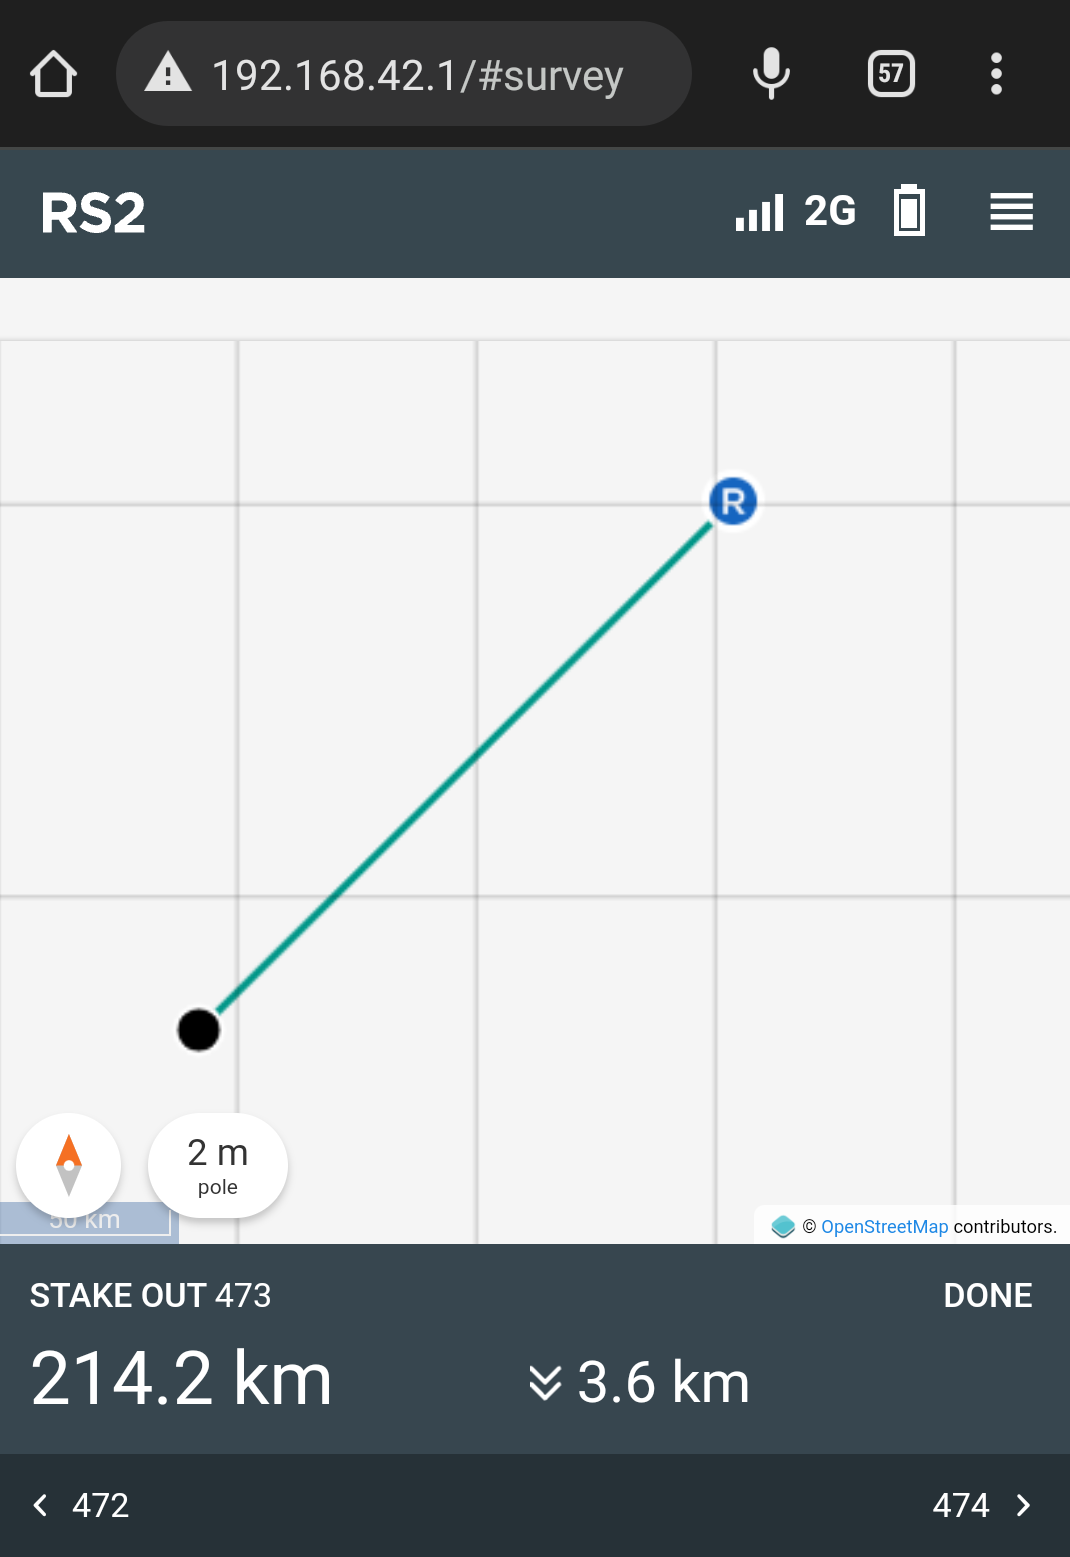
As for the total distance in Stakeout, it’s now shown near the rover icon:
If you’d like to share any feedback with us, feel free to do it here!
21 Likes
The development they have is incredible, this brand has a great future for technical support and being aware of customers and their needs.
Thank you very much for implementing the tools.
14 Likes
Hi Javi,
Thank you for these kind words! I’ve passed them on to our developers ![]()
5 Likes
Thanks to the Emlid team for bringing back the real-time coordinates and distance to stake out point.
Excellent work.
I keep suggesting that you have to show the AZIMUTH to the setting out point, it would be easier to find the point knowing the azimuth in real time and with the help of a compass. It is a simple algorithm to implement.
4 Likes
@polina.buriak Can we also add PDOP to the status bar while measuring points?
Thanks for everything you guys do!
5 Likes