My Software Setup using 4G, Mission Planner, GStreamer

I thought I share some details on my current software setup with Navio 2:

The hardware:

The drone: A custom built quad with Navio 2, RPi 3, RPi Camera v1.3, Huawei e8278 modem
See here for more details: Navio 2 build and first flights!
Server: Free azure website, running windows, IIS, C#, ASP.Net
Ground Station: Normal Windows 10 PC.

First, to get it all connected the ground station need its own public internet IP. This is not always so easy. When using my laptop outside, I use a 4G modem with a special “APN” that is specific to my mobile provider. This APN gives me a unique internet IP that is not shared with others.

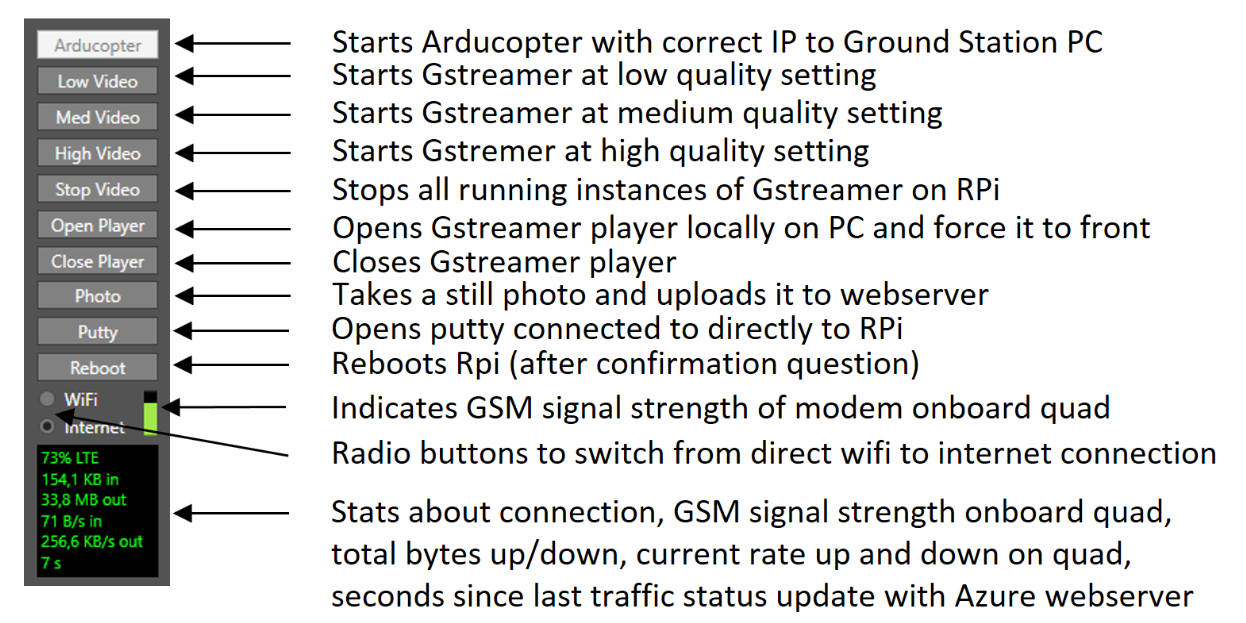
In my setup I’ve written a simple Python3 script that runs on the RPi at startup. It is never ending and periodically makes a HTTP query to a webserver (running on Azure). The webserver holds a queue of commands that the drone receives, like starting and stopping Arducopter, GStreamer, take a still photo etc. The scripts also make a HTTP query to the onboard modem for GSM connection details. I found out that most Huawai modems have a web API that you can call to get a XML document with connection details. This data is uploaded to the webserver. The drone is also able to upload photos to the server.

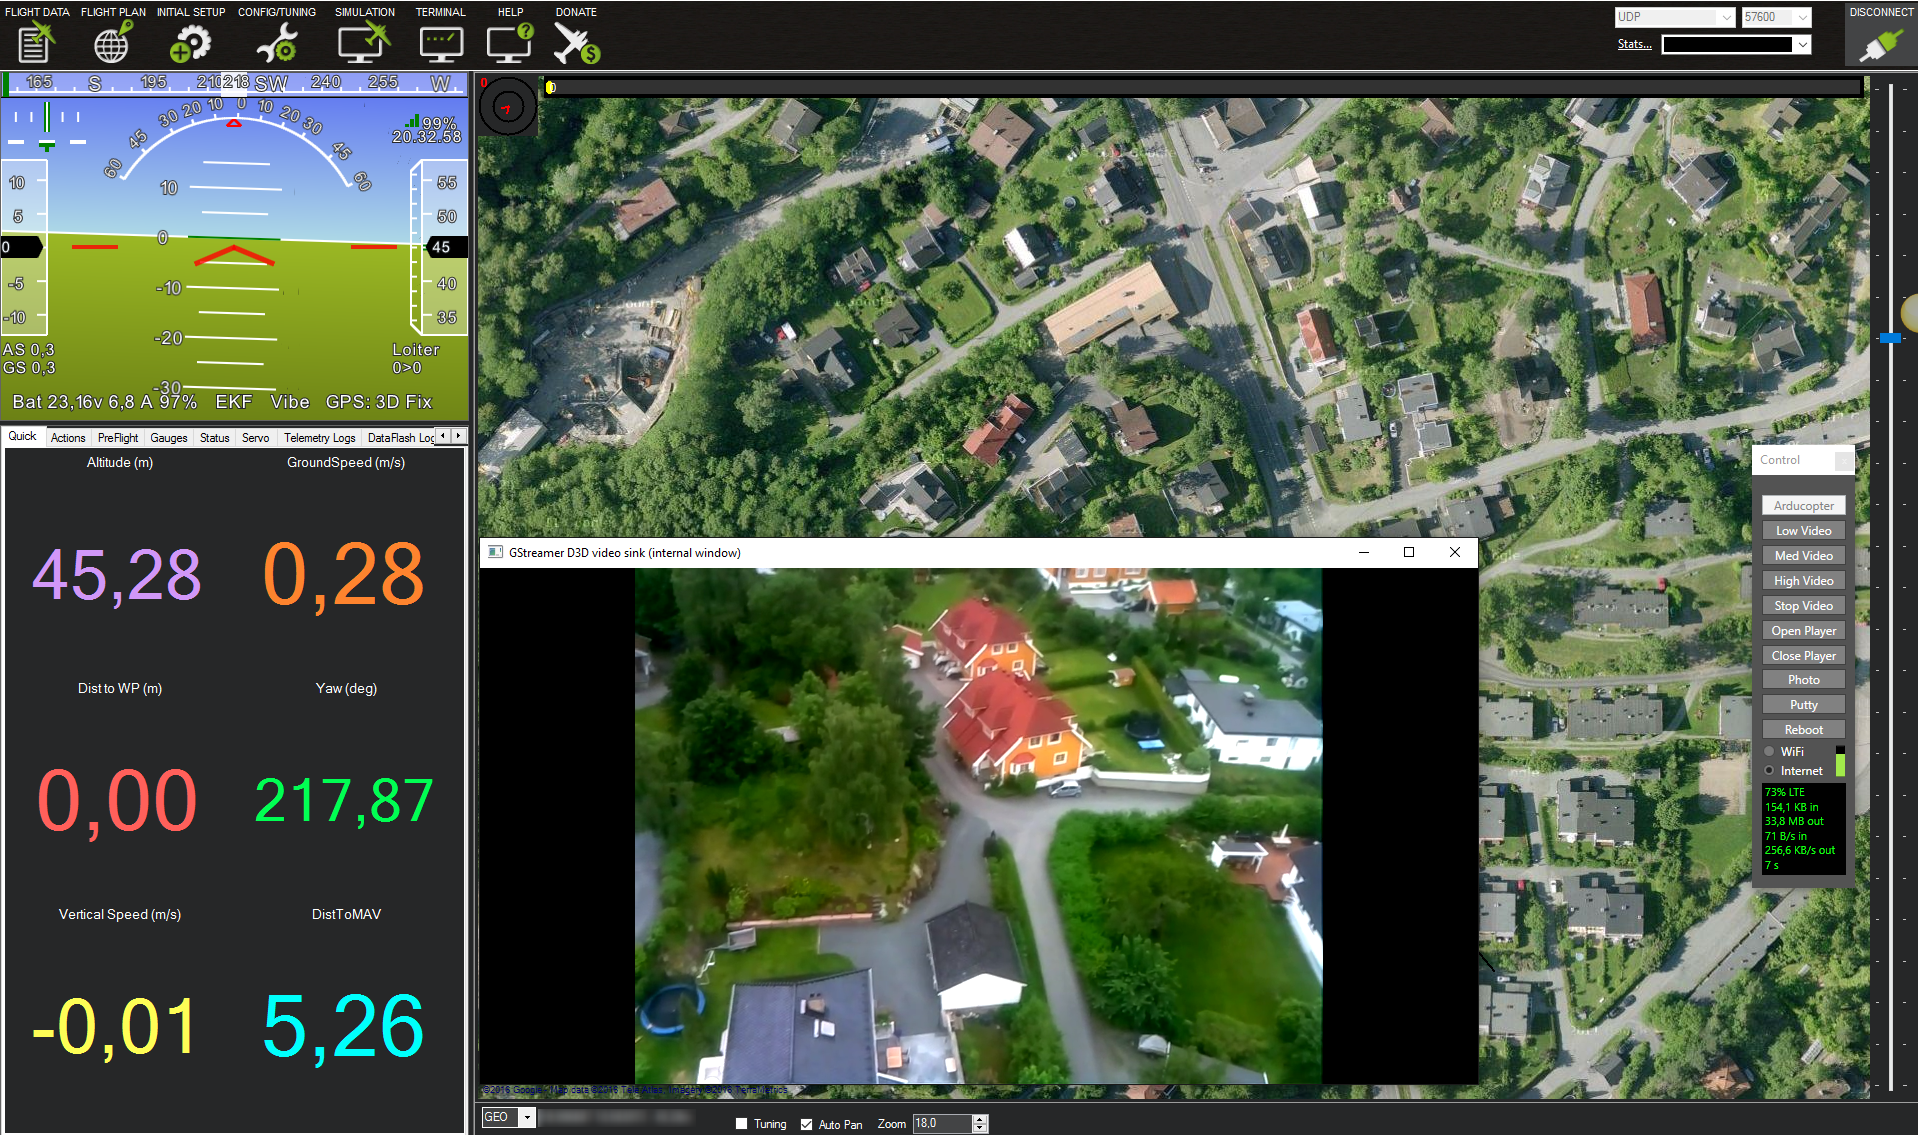
On the Ground Station PC I’m running a small C# program that is in contact with the webserver. It is able to upload commands to the webserver and enables me to easily start and stop functions with a simple button. The program gets the Ground station IP from the webserver, and use that to send the correct command for starting GStreamer so that the drone streams directly to the PC.

To start it all, I simply start the local control program, and turn on the drone. After about 10sec, they are connected and I start Arducopter with a click, then I can start the video with another click.

With Rpi3 and Navio2 I’m able to get really good and glitch free video, and the video latency is around 200ms with a 4G connection.

I’m happy to share the code, but at the moment I have not added any password protection on the drone or webserver, so anyone that knows the address of my webserver, could take over my drone :slight_smile:
Once I’ve added some security to it I’ll publish the code if anyone is interested.

The GStreamer parameters I’m using:

High            _lastVideoMode = "raspivid -n -t 0 -rot 180 -w 960 -h 720 -fps 30 -b 2000000 -co 60 -sh 30 -sa 10 -o - | gst-launch-1.0 -e -vvvv fdsrc ! h264parse ! rtph264pay pt=96 config-interval=5 ! udpsink host=" + _localAddress + " port=5000";
Med            _lastVideoMode = "raspivid -n -t 0 -rot 180 -w 640 -h 480 -fps 30 -b 600000 -co 60 -sh 40 -sa 10 -o - | gst-launch-1.0 -e -vvvv fdsrc ! h264parse ! rtph264pay pt=96 config-interval=5 ! udpsink host=" + _localAddress + " port=5000";
Low            _lastVideoMode = "raspivid -n -t 0 -rot 180 -w 320 -h 240 -fps 30 -b 250000 -co 60 -sh 50 -sa 10 -o - | gst-launch-1.0 -e -vvvv fdsrc ! h264parse ! rtph264pay pt=96 config-interval=5 ! udpsink host=" + _localAddress + " port=5000";

More details will follow!

15 Likes

I was looking for information on how to do this.
But beyond my ability to understand this.
I would be very agradesido if I put a guide on how to achieve this.
Many grasias por share and a great job.
Sorry for my bad English.

Hi Ole, very interesting indeed.
did you use APIs to update network settings ?
-dan

A quick demo

7 Likes

THAT IS AWESOME!!!

Great work @ogulbrandsen!!!

1 Like

the result is just amazing!!
Are you managing to obtain this level of performance with RPi3 only (running in the same time ArduCopter and GStreamer)
Last time I tried my drone was very sluggish so I had to install a RPI Zero dedicated to the video streaming :frowning:

Did you connect your usb 4G routeur directly to the RPi or are you using Wifi on the drone? If yes could you please tell the “protocol” to be followed? I have read some articles that all use sakis3G which seem to be outdated.

As I am using a 4G Wifi routeur plugged on the RPi3 USB port to set a local wifi network on the drone. The result is a local wifi network (not connected to the internet) for my RPi Zero, RPi 3 and GCS.This is quite convenient to avoid using 4G for all flights… and less complex to set-up! :wink: but the range is quite poor…

I wonder if this would be possible to avoid having a Wifi dongle on the RPi Zero and connect directly to the local network through the USB 4G Key. I would save same weight in wifi dongle and USB cables.
I would as well prepare to switch to 4G streaming and telemetry for long range flights.

Thanks very much for your amazing posts… You just have realized my drone dream!!
Guillaume

Yes, I had similar problems with RPi 2 and Navio+. Things are better now:

  • Navio 2 use less CPU due to hardware PPM encoding/decoding
  • RPi 3 is faster than RPi 2
  • The new RPi camera has better colors

Combined, the stream is super stable and I’m able to get much better quality over 4G

Yes, I’m still using a local WiFi onboard the quad to connect the RPi to the onboard modem. It’s just much easier to set up and more reliable. (At least to an inexperienced Linux user like me) The added benefit of an onboard router is the option of connecting to the drone with WiFi on close range. ( In the video, I’m not doing this, it is 4G)

You can connect a USB modem directly via the USB port, but to my experience it is a little tricky to set it all up, only a few modems seem to work without messing with complicated setups. (and there is hardly any documentation). You also need to deal with reconnects etc in case you loose coverage for a few seconds. The 4G WiFi router deals with all this automatically.

I’m quite surprised with the result and how well it works and reliable it seems to be. It’s very well suited for a really long range flight. To test the connection I’ve left the drone in a car while some friends drove around for a day. The connection worked the whole day. I’ve also tested what happens if you break the connection, by just turning off network on the PC. The drone goes to RTL mode and lands where it started.

4 Likes

Thanks for sharing!
Indeed, I am as well using an RPI3 + Navio 2 so it seems I should not need extra calculation power to run gstreamer while in flight
What are your parameters (fps bit rate resolution) it seems you are able to stream very smoothly at near HD. Is there something specific with the gpu memory allocation?
My last trial was really catastrophic in terms of responsiveness of my quad.

I hope to do the same when I am good enough with the 4g part of your set up. At the moment it still seems to me kind of a big topic… any documentation surely appreciated!

Guillaume

Hi Ole,
Have you added security now, so that you can publish the code? Indeed, I am very interested. Really exciting stuff you have created! You have taken drone flight to the next level with Navio2! A really stunning video. I need more details when you are ready.

Great quality of the video downlink.

Im using a local wifi connection with Navio2 Rpi3 and Raspicam 1.3.
The connection is good, but I got a very wobbling picture.

How did you stabilze your Raspicam?

These are the parameters I use:

High quality:
raspivid -n -t 0 -rot 180 -w 960 -h 720 -fps 30 -b 2000000 -co 60 -sh 30 -sa 10 -o - | gst-launch-1.0 -e -vvvv fdsrc ! h264parse ! rtph264pay pt=96 config-interval=5 ! udpsink host=#LOCALIP# port=5000

Med quality:
raspivid -n -t 0 -rot 180 -w 640 -h 480 -fps 30 -b 600000 -co 60 -sh 40 -sa 10 -o - | gst-launch-1.0 -e -vvvv fdsrc ! h264parse ! rtph264pay pt=96 config-interval=5 ! udpsink host=#LOCALIP# port=5000

Low:
raspivid -n -t 0 -rot 180 -w 320 -h 240 -fps 30 -b 250000 -co 60 -sh 50 -sa 10 -o - | gst-launch-1.0 -e -vvvv fdsrc ! h264parse ! rtph264pay pt=96 config-interval=5 ! udpsink host=#LOCALIP# port=5000

I would recommend getting it working with WiFi first, then try 4G. With WiFI you should not have any issues with latency, but the range is limited of course, so stay close. In the area I live 4G adds around 100ms latency.

I have in fact, will publish it very soon! Just need to find some time. At the moment I cannot test anything as the quad is taken apart so I can build the new one. These days I’m waiting for some parts in the mail… In 1-2 weeks I’ll make a detailed post with everything

1 Like

No stabilization, just a very calm day and the quad I used is very stable too.

Hi @ogulbrandsen really amazing work! Can you share your setup please? Thanks a lot!

1 Like

Currently I’m still waiting for some parts in the mail and setting up the new quadcopter. Cannot test anything right now…

Hey, can you share the program that communicates to the drone over the webpage? i would be super interested in seeing how you can take a screenshot and change the quality. I soo need this little program in my drone project.

Hi, here is a zipped version of the source files (and the exe file)
DroneStation.zip (245.3 KB)

PS: Remember this is just a quick and dirty prototype I put together, it works for me, but there are many things that could be improved and fixed.

There are three parts to it. The script that runs on your RPi (included in the files), the server (source code not included here), but server is live. and the exe windows program. You should adapt the python script to match your modem. How you find some help in it!

5 Likes

Thanks!! We’ll give it a try!

Does the computer (Windows) have to be connected to internet via 4G as well or it can be over WIFI?

Hi Ole,

On this build did you use the on-board WIFI on the PI3 or did you use a separate USB dongle for your local WiFi? The PI3 should be able to connect without a dongle.

Hi Ole.
I’m interested about the 4G connection with copter,but I can’t understand why we need RPi3 on it,
Is the RPi3 work for connecting to internet and package message form copter to the http server?
Is there sql been buid in the http server or not ?