


What does this mean exactly? Will this type of camera integrate with Reach to geotag the photos or is this done through software?
Can someone name a few cameras that have this hotshoe adapter and tell me (show me) how to connect this?
What does this mean exactly? Will this type of camera integrate with Reach to geotag the photos or is this done through software?
Can someone name a few cameras that have this hotshoe adapter and tell me (show me) how to connect this?
Sony RX100 III seems like the best lightweight, high resolution, hotshoe camera for me to use with the 3DR Solo and Reach. Any reason why this camera would be a bad idea?
I plan to buy a fixed gimbal from IMP Concepts (http://www.impconcepts.com/impstore/index.php?route=product/product&path=33&product_id=115).
Reach is capturing the time when the picture has been taken from the flash sync pulse available on the hotshoe adapter. These timestamps can be processed to get the coordinate of the images.
@igor.vereninov Thank you for the quick responses.@Mayehem have you been able to complete your Solo setup?
Has anyone created a step-by-step video or documentation for integrating Reach into 3DR Solo? I’d like to see something similar to Piksi’s “3DR Solo Integration Guide”.
Here is where I’m at:
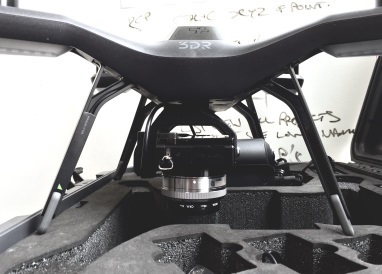
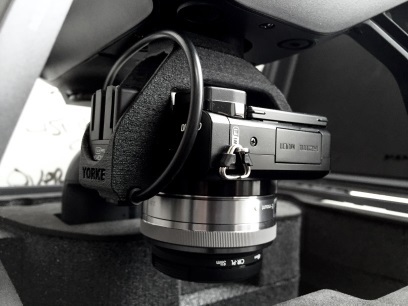
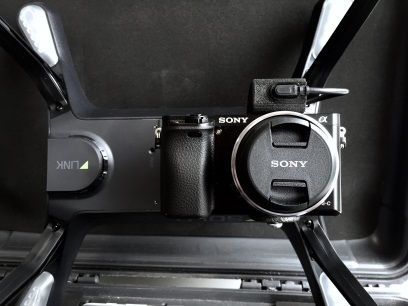
I have the 3DR Solo, Sony A6000, Emlid Reach Kit, and IMPConcepts Fixed Accessory bay gimbal. I know this may seem a bit heavy (450g+/-), but I’ve seen heavier, including Escadrone’s QX1 set-up (499g).
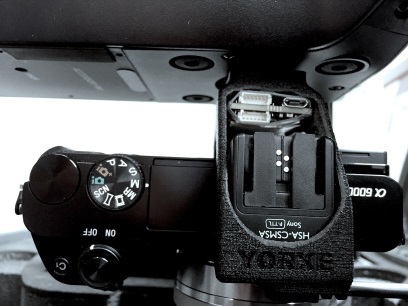
I know how to physically connect the camera to the gimbal and to the Solo. I plan to use the hotshoe connection outlined by @timvand. I also plan to connect the hmdi cable to the camera and I think this will work to trigger the camera. I’ve seen the docs on how to connect Reach to the Pixhawk, but I’m not sure how to connect it to the Solo and/or controller.
Also, after the initial Reach setup and once everything is connected, do I need to do any special configuration of Reach? Thank you.
My Reach is unfortunately still in the packaging due to other commitments. However lately I have been steering away from the Solo as the ideal platform for mapping. The main reasons being the hopeful flight time with sensor and addons is 15mins. The other reasons being that 3DR is moving into enterprise with Solo and support for apps like Tower and availability of replacement parts without the hefty enterprise commitment is questionable. Plus on a traditional pixhawk set up I can have longer range and the ability to replace parts and fix issues on the spot due to experience. I love my solo but think it’s limitations are holding it back from being an actual field reliable tool. Many bugs are popping up that I would not want to happen in front of a client.
I am leaning hard towards ordering a Easy Drone XL kit. Double the flight time with a much more robust sensor option. It is the right price to benefit from the convenience of RTF, no tweaking or questionable testing, without breaking the bank and having support.
@Mayehem I don’t mind the shorter flight times (yet). I will probably move to a bigger/better drone later. How do I connect everything to Solo?
I have done the initial Reach set-up and configuration. I have also added the hotshoe connection per @timvand instructions. Now I just need to know how to connect the reach to the 3DR Solo and the best place to put it.
Base:
I connected the Reach to GPS antennae (with baseplate) and to 3DR Radio Telemetry Kit 915Mhz Module via the USB/MicroUSB cable.
Rover:
I connected the Reach to hotshoe connection and the DF13 6P-to-6P (Not sure where this connects on Solo). Then, I have the other 3DR Radio Telemetry Kit 915Mhz Module with DF13 6P-to-6P (Not sure where this connects on Solo).
I’m just not sure where to connect these on the Solo. There is an accessory bay with 30pin accessory port (https://dev.3dr.com/hardware-accessorybay.html). I’ve seen the Pixhawk diagram connection but this isn’t the same for Solo, right?
You can connect Reach through the breakout board and inject the GPS info. Check the Docs section under APM integration.
I was not heading this route because there are bugs where the firmware switches between the best available GPS solution and is jumpy with it’s corrections between locations (never followed up to see if this has been ironed out yet)
My plan was to power the reach module and trigger the camera through AUX 6 or 7 with the board. Then hot shoe to reach for the time stamps, post process using RTKlib etc…
Denis at Emlid told me
“The best way in your case is to post process the data. In this case you will just need 2 raw logs, no radios needed. No connection to Pixhawk is needed as well.”
I now have the 3DR Solo setup ready to go and it flies with no problem. However, I am having a few issues with Reach configuration:
@Mayehem I ended up following Denis’ advice and connected the Reach to the Solo by soldering a connection to the JAE SJ038252 connector (5V and Ground) on the accessory bay.
@cczeets Do you have any advice on configuring this setup to get better results?
Does anyone know how to get an Sony A6000 to trigger via Tower?
No there is no need for Internet connection.
This depends on how you install your antenna. Make sure that you are using a ground plane under the antenna and that it is installed on the top of the vehicle.
During post processing you will be able to use averaged position of the base, which will give you a precise, but not accurate result. Do get an accurate result you need to post process your base log against another base with known coordinate, for example CORS. This is explained in the tutorial.
For post processing simply configure both devices as rovers.
It is stored in RINEX files.
@igor.vereninov Thank you for the quick response.
@Buckeye_Nick I’m also looking to test out Reach on the Solo and it looks like you’re progressing well. Do you have any photos you can share of your progress so far?
I gather you’re attempting the “Can I have both” pixhawk and camera timestamp integration?
Would you mind (or anyone else on here) providing a bill of materials for what is needed as I’m just about to place my order and want to be sure I’m getting everything I need. Is the REACH RTK KIT all I need to order from EMLID?
I’m still deciding on camera so will be good to see how you get on with the Sony A6000
@Yorke Here is what I have compiled so far. I need to add photos and figure out the Reach configuration for this setup. I am having issues with ReachView. I need to figure out which settings to use. I’m trying to follow this:
Drone Documentation.pdf (164.2 KB)
@Buckeye_Nick thanks for all the details, I’ve just placed my order for the Reach Kit, shame I couldn’t have got the “reach4th” sale price of $499.
Now on to shop for all of the other items.
@Yorke I am thinking about adding a lipstick style usb power supply to the rover (drone reach unit) instead of powering it by drone battery. It can take a few minutes to set up Reach and I am already looking at reduced flight time due to weight, so why drain the battery further. The usb power supply weighs about 70g, so maybe it is a trade-off. But then no connector or soldering is required (except for hotshoe).
@igor.vereninov I was out at a test site and I couldn’t connect to the Reaches. Previously I have connected to my home Wifi and both Reaches are displayed on my laptop via the IP addresses. How do I connect to the Reaches without internet? I see the Reaches listed in the Wifi, but when I connect to them I see the Edision setup from when I originally set them up. Since I don’t have internet I can’t give them a Wifi and password to connect to.
@Buckeye_Nick that external power supply sounds like a good idea. How are you finding the payload, especially with the 344g a6000???
I’m just deciding on what camera to buy now and the weight of the a6000 has me worried about performance and flight time. I’m also considering the Sony a5000 or a5100 at 60-75g lighter or the QX1 at 128g lighter, but then having the no hotshoe issue to deal with. Or holding out for 3DR to release the Sony UMC-R10C gimbal & camera. But really want this working asap so don’t think I’m patient enough to wait it out.
@Buckeye_Nick also, did you figure out how to get the Sony A6000 to trigger via Tower? and can you get a live feed via the hdmi connection back to the Solo app or Tower?
@Yorke I have not been able to trigger it from Tower yet. I bought a Sony Time Lapse app for the camera ($9.99) and set it to take photos at 2 second intervals. To start it, you have to be in the app and then press the shutter release. Once it lands click it again to stop.
Yes, the HDMI connection displays a live feed to Tower or Solo app.
@Buckeye_Nick thanks, I’m getting closer to deciding on the Sony a6000. Have you managed to get a few test flights in? Any feedback so far on the weight of the total payload for performance and flight time?
@timvand @Buckeye_Nick Here’s where I’m at with the Sony a6000, 3DR Solo, and Reach integration. I’m still just waiting on the last piece of the puzzle which is that shutter cable from Flytron.
I was hoping to just give it a test run on time lapse mode while waiting for the trigger cable, however due to the Sony PlayMemories/Playstation payment issues that have plagued them for months, I am unable to purchase the time-lapse app for the camera. Ridiculous that it isn’t just a built in functionality off the shelf!
The mount I’ve designed comes in at about 36 grams, but still has some more optimization to go through which will bring that down even more (This is version 0.6 shown in the pics). It uses the rubber dampeners from the stock fixed GoPro mount and also houses the Reach module so that the whole system is independent and easily removed.
The one question I still have to solve, is where best to locate the antenna? I was planning to mount it on top just next to the battery release button, which would also have it centered exactly above the lens. Is there any reason not to put it there? Also, does it need to have a ground plane or will it work on its own?
Woah, this is awesome! Really neat install.
If you have a TW4721 from the kit it needs a groundplane and I would recommend mounting it on a pole as Solo has plenty of electronics that could produce interference.