


Originally published at: https://emlid.com/two-for-one-mapping-two-areas-in-one-mission-with-a-drone-and-reach-rs/
Switzerland is famous for its picturesque and thought-provoking landscapes with amazing views and breathtaking architecture. Behind every landmark, there is a significant amount of planning: regarding the placement of the new building and ensuring it is harmoniously embedded in the surrounding landscape.
3D mapping helps when assessing a place’s potential. This is a job for Topodrone SA. Together with Argus SA, a company that creates turnkey projects in the field of design and construction, they created a 3D model of two pieces of land at nearby Lake Geneva.
Getting Started
The Argus SA team had two sites, which were out of sight of each other, to explore and analyze for further design. They needed precise mapping of the sites, their elevations, and any nearby infrastructure to move on with their project.
To create a 3D map, Topodrone team’s setup for this project included:
- Two Reach RS+ receivers for two purposes: rover and base setup to mark the ground control points (GCP) and base setup to collect RINEX data during flights for PPK;
- A DJI Phantom 4 Pro PPK with an additional installed RTK receiver connected to the camera – an upgrade by Topodrone SA;
- Software: Pix4Dmapper for 3D modeling, RTKlib for GNSS data post-processing, and TOPOSETTER APP for image geotagging.
Mapping the Sites
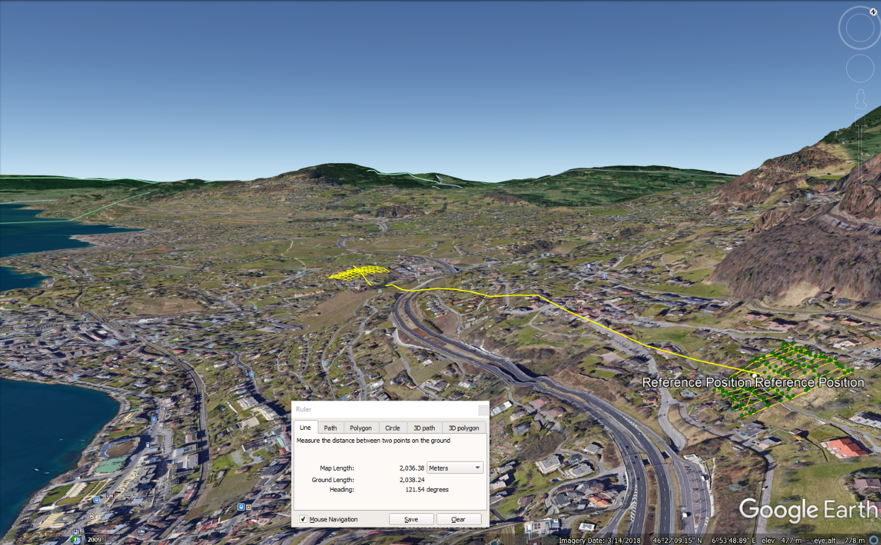
The team had two areas to map and survey situated within a 2 km range of each other. First, the Reach RS+ base unit was set up over a known point, and then the team collected 7 ground control points with another Reach RS+ unit in RTK mode.
Even when using the precise PPK equipment, setting several GCPs over the site helps you to make sure your data is accurate. They also help you align the photos with the map afterward and stitch the pictures together with more georeferencing accuracy. The team used one base for both areas. To survey area №1, they used the base set in area №2 and got precise and accurate data. In general, all the fieldwork and flights took the Topodrone team no more than an hour.
The key part here is the post-processing of the accurate data and turning it into the 3D map. The team uploaded both RINEX logs from the base and logs from the drone and merged them to get accurate coordinates for each image location. When these coordinates are later assigned to the pictures from the drone, it helps the team create the orthomosaic. After the initial processing, they make sure the GCPs’ locations are exact and run the test for the accuracy report.
Accuracy report. The error is minimal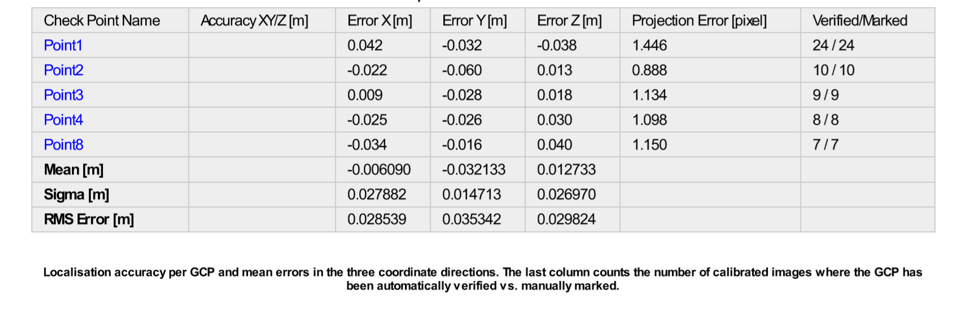
After all the checkpoints and GCPs are checked, the team creates a digital surface model (DSM) and a digital terrain model (DTM) of the sites. The final results and aerial photo triangulation were again checked by using the checkpoints.
-
Ground check points location
-
Defining check points location in Pix4Dmapper
-
Dense points cloud
-
Dense points cloud classification
3D Model for Future Projects
The Topodrone team has created a high accuracy 3D model of the sites that can now be used for further work. With all the details and infrastructure visualized on the 3D map, Argus SA can proceed with their project.
-
3D model of Area 2
-
3D model of Area 2
-
3D model of Area 2
-
3D model of Area 2
3D modeling and mapping using Reach receivers and drones is a great help for exploring new areas and also for future construction planning. You get a bigger picture with Reach devices!