


Hello everyone,
We are doing an engineering project on quadcopter. We have decided to run on raspberry pi 2.
we have ordered the navio+. we went through the forums of emlid and i’m not getting satisfying answer for queries. we are planning to implement these functionalities on the copter.
step 1: the copter should hover a certain feet above the ground.
step 2:we fix a desired gps location to it from the pc.
step 3: the copter should hover to the desired gps and come back to initial position.
step 4: while hovering to the desired location it change it path if there are any obstacles.
we are planning to do this without rc controller. that is everything should be automatic. We are computer science background and we hardly understand any electronic buzz words like “ESC calibration” etc. Please provide me some suggestions on how to proceed with the project. Since the project is time based and score based it would be grateful if anyone could give me the idea at the earliest. And also suggest how navio+ is going to help us in these implementations. Please reply to this post ASAP.
Read this, http://copter.ardupilot.com/
it covers all those “electronic buzz words” and everything else you need to know. If you read through all of it you will be able to build a multirotor.
Good luck
thanks Aquila,
but he mentions about pixhawk controllers in that. How can make necessary test on navio+. which is good flight planner to install?
All of the questions you have posted, and doubled posted can easily be answered by reading the documentation.
Anything that is not covered in the arducopter documentation (NAVIO specific stuff) is in the “docs” section on this site.
“but he mentions about pixhawk controllers in that” - Navio makes a raspi a pixhawk, you would know this if you used the search function in the forum as this has been addressed a few times
“which is good flight planner to install?” - If you read the documentation you would know this!
“step 4: While hovering to the desired location it change it path if there are any obstacles.” - If you are stumped by how to setup a multirotor I doubt you will have much luck implementing obstacles avoidance as this is a much more complex function and would require a thorough understanding of Ardupilot.
“we are planning to do this without rc controller” - You need a controller to tune and configure your multirotor to get it to the point where you can run auto missions, so you will still need a controller even if you plan to do auto missions. Not to mention running a multirotor without manual control as backup is reckless and unnecessarily dangerous.
Good luck.
thanks Aquila, you’re post was very much helpful. I will get back with more specific questions next time.
There is an ongoing discussion at DIY Drones (lots of links in the latest posts) about the capabilities of Pixhawk (and thus Navio) obstacle avoidance, but this one appears to be one of the most realistic:
Using a gimbal to tilt a single LIDAR is very smart.
The LIDAR Lite (now at v2) is cheap enough to play around with, add a gimbal and you’ve invested 200-odd euro for a “kind-of 360 degree” scanner:
http://www.robotshop.com/eu/en/lidar-lite-2-laser-rangefinder-pulsedlight.html
But really this all needs to be optimized down to much smaller physical sensor devices/chips, give it a year or two.
For now, if you’re building a big enough drone you might be crazy enough to spend a couple of hundred euros more to swing one of these around:
http://www.robotshop.com/eu/en/rplidar-360-laser-scanner.html
Not sure what the centrifugal forces will do at 400+rpm, or how long the battery would last then. Perhaps it’s best on a plane, if at all in the air.
Both these solutions require a big budget and tons of time with no guarantee of decent results. I’d pick a different project which doesn’t require collision avoidance, unless you’re deliberately trying to graduate with some ground-breaking technology.
p.s. Not wanting to sound negative. Personally I would actually go ahead and do it, because it’s a fantastic challenge. It would just be wrong to recommend the average student attempt it, if failure had a serious impact on grades/career opportunities.
thank you for valuable suggestion code chief. The catch is we were instructed to not concentrate much on the hardware spec. since we are doing project on the software part we had an idea getting a built drone and customizing it but no one has an answer to it.
Ah I understand… Well there are lots of other software projects possible with APM, very interesting too.
They are mostly achieved with MAVLink protocol programming, like automatic mission planning reacting to either external messages or onboard data (like sensor input or MAVLink telemetry), e.g. fly somewhere, measure something or receive a message, then adjust the mission accordingly.
Some random ideas:
- Patrol drone. Takes off every # minutes and takes pictures or video around a building/property.
- Virtual panorama. Like the patrol drone except stitches images together to make something like a 360 timelapse video.
- Variations on existing mapping solutions. Perhaps install one of the new Kodak 360 cameras and/or the cheaper Flir heat camera and stitch all the data together. Like they were doing recently in Egypt to map the pyramids.
- Monitoring busy highways to measure congestion statistics (but then you need a lot of failover in the drone, e.g. Y6 or X8 motor configuration and maybe a second GPS).
- Adding RTK accuracy with Reach (they have educational discounts) and doing highly-accurate variants of existing mapping projects, think of some scenarios where that is important to demonstrate it.
- Multiple onboard computers (recently discussed after the announcement of the PiZero as the reduced size makes this much more feasible).
All of those things have potential commercial use for agriculture, architecture and government applications. So should be good for grading  Search the forum here and DIY Drones for a wide range of ideas being discussed.
Oh atlast someone here in this forum understood my problem thank you codechief once again.You mentioned patrol drone that is the exact thing we are about to implement.But with a smal change it should travel to specific location capture pictures there come back go intial location upload pictures to google cloud and it can be accessed frm the IOT. This is the abstract about our project.so now tell me is it good to go with customizing a ready made drone or doing it from the scratch
As software is the focus best copy somebody else’s selection of frame, power pack (= PDB, ESCs and motors, propellers size/tilt), telemetry/radio and configuration settings. As you need to take a picture of a specific location/angle gimbal will be necessary. Maybe something like this:
http://community.emlid.com/uploads/default/original/1X/f97b640dd5fdf0198db3ae18b237b81d18bbc0e6.jpg
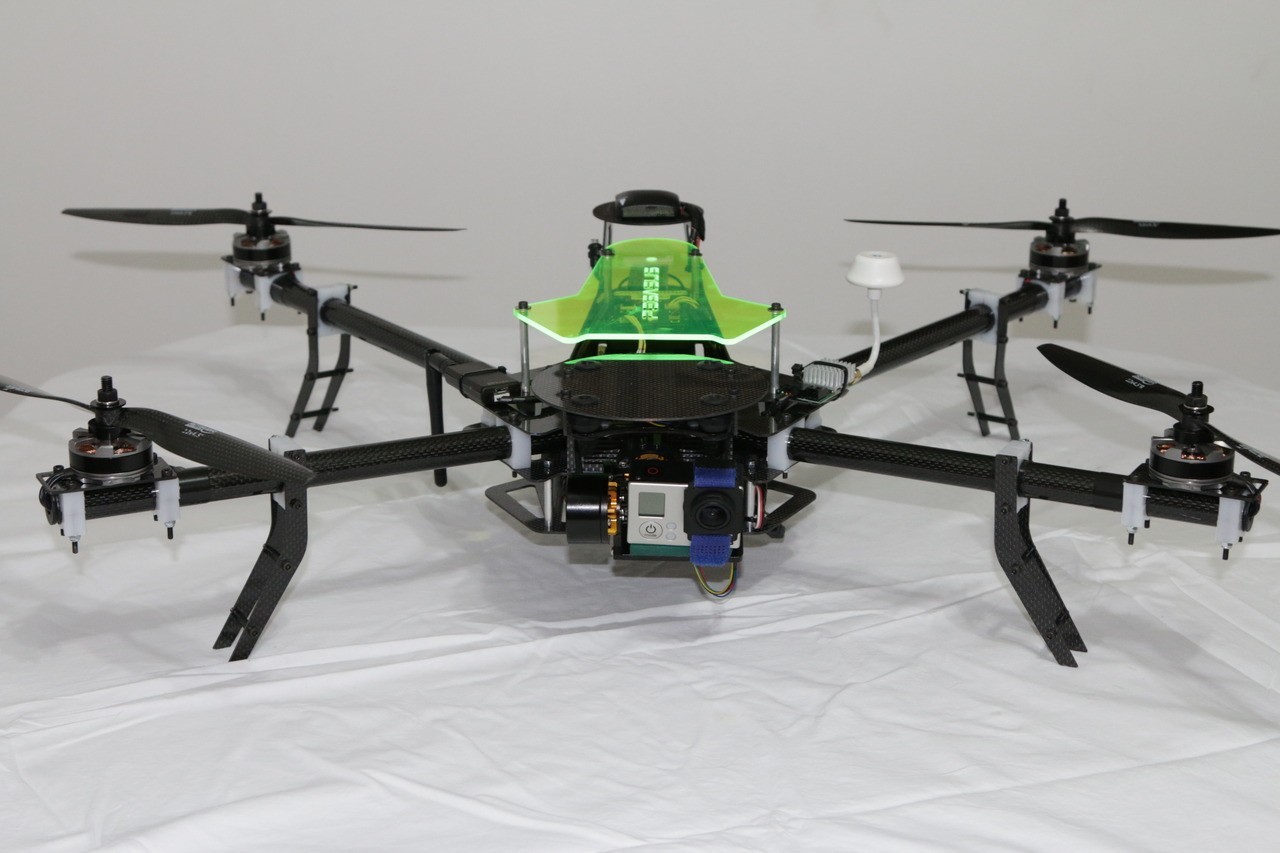
Discussed in this post:
Or a similar combination, with alternative frames like these:
Number 3 looks the most professional but as the price is a lot higher I would go for #1 which looks almost identical. If you browse around HK and other RC shops you’ll probably find the same bits. Look in the “projects” section of the forum for more information about Navio specific builds.
Shopping list:
Q450 Quadcopter Frame 450mm209 $12.55
Q Brain 4 x 20A ESC210 $29.92
Multistar 2212 combo, set of 2197 2 x $23.99
ZIPPY Flightmax 3000mAh 3S1P 20C129 2 x $14.65
Navio+96 $168
Power module117 $24
Raspberry Pi 2 $35
GNSS antenna96 $12
Zip ties57 $2.33
Battery strap64 $2.11
GPS Antenna pole86 $4.96
Male to male servo leads92 $1.80
Gyro mounting pad124 $2.39
Wi-Fi Dongle $5
Wont these above components list do the math codechief…these were the components posted by igor in forum topic:450mm quad build…sorry for that as far as now i have the navio+ and its related package and pi2 model b. Now shall i buys these above listed components does my project work with these??
450mm quad build component list copied from this post. And really we guys are getting worried until we are getting the quad above the ground. This project is getting 200 score points for our final semester its important to us. I would be so grateful that if you guys help me at each point of the process. I have the navio+ and pi2 model B and that’s it and what’s next is the question?
No problem I almost posted a link to that for you too. The build from Igor is effectively an Emlid reference model so you have the best support from him/Emlid with exactly the same setup/settings.
The only thing missing is a camera. But fear not because those 450 frames are really popular and there are many options. You could even get away without a gimbal as in autonomous/missiom mode APM can also point the drone in a direction.
Depends on your budget. Cheapest is to strap a mobius or runcam2 undermeath with a slight tilt down (wedge or 3d print mount). More professional is a proper gimbal and gopro. or mid-range which should be possible at uni (with 3d printers available) to just get an open source gimbal controller and motors then pick one of many gimbal designs on Thingiverse.com and print it.
For gimbals refer back to others on the forum with more experience in that area. I know the core stuff but have been mostly building racing quads and programming sensors/hardware so far.
It’s safe to get the Igor build flying, then play around with mission planning and stick a mobius on as phase 1. At which point you can already start programming.
Then deal with the gimbal as a background task as time/funds permit. Maybe you’re happy with the fixed action cam results and it would be useful to keep later as a potential copter view/live feed.
If you end-up with both cameras in phase 2 then the patrol drone has two points of view, direction of travel from fixed action cam and then a “target” from the gimbal cam. That’s super cool as there is GPS math possible which allows you to calculate the position of the target based on your known drone position and the vector of the gimbal. All further steps in a very interesting project. But step 1 is easy, Igor’s build will fly!
Correction your camera must be connected to the Pi either directly (PiCam) or USB. Even when you have an action cam some of them support webcam mode, e.g. Mobius. If you’re a pure software guy and don’t like soldering get the PiCam. Logitech USB cams seem popular but you may need to hack a power cable onto the Pi motherboard from an additional 5v BEC.
Whatever you choose must be supported (have device drivers) directly in the current Emlid Realtime Linux OS build. A little PiCam on top is a safe first choice.
thanks once again CodeChief, I have made my choice to go with Igor’s build quad and those components. Since our expenditure is already now 11k INR(indian currency) for the Navio+. We were thinking to cut down the cost for the quad, and as you said I prefer to go with fixed cam, afterwards if time permits I would head for gimbal. I will buy those components (Igor quad build) and will have a quick briefing about this with my teammates. Once i’m done with that I will come back with any Queries if I have. And another kind request please update your solutions for our problems ASAP because it shouldn’t make us waiting or atleast refer any Indian who has done this with Navio+ so it would speed up our project. Thank you!!! Sorry if i’m querying you constantly that had made you puzzled “why this guy is so much confused?”
jeez!! i don’t get this frame Q450 Quadcopter Frame 450mm209 on hobby king any substitute frame for this? less than 450mm. hobby king not shipping lipos they have problem any alternated solutions?
This looks cool and appears to be in stock… http://www.hobbyking.com/hobbyking/store/__66628__Q450_Ghost_Edition_LED_Night_Quad_Copter_Frame_KIT_.html
okay im done with choosing the parts list for the quadcopter.
Here are those below please tell your suggestions and tell me if I have missed any of the parts.
250mm frame:
(OR)
Motors and ESC combo pack:
Lipos:
please tell if I have missed any thing and input your suggestions.Thank You!!
And which charger should I use for Lipos. If still more we are doing an App to control the quad. Do we still need RC controller. If so suggest good and cheap price RC controller.
Careful you have mixed-up specifications of the frame and power pack (battery C rating, ESCs, motors and propellers).
You can’t take the specifications for a 250 quadcopter and put them on a 450 frame, it might fly but it will likely be under-powered and inefficient.
Why don’t you just order the original shopping list and just get the Ghost Edition 450 frame instead of the one which was not in stock?
I strongly recommend you FIRST reserve a few hours and watch some of the Flite Test beginner videos (actually it’s quite entertaining the way they present it). Then you understand what all this means and can avoid disaster:
Power:
Batteries and ESCs:
Radio Control:
How to fly:
Also you could go to their web shop and look at the “power packs” they sell, because they show in their shop which models are compatible with which “power packs” then you have a guide for which combination of battery (C rating and capacity) ESC and motors will be correct. Or just take the original shopping list from Igor
By the way 250s are too small for projects where you might want to upgrade to a Gimbal later.