


Hi folks, I’m beginning work on a drone-based salt marsh mapping project in the next few weeks. I was wondering if anyone has had experience placing ground control points in a marsh/wetlands setting and any advice on materials or best practices to do this. I’ve seen some folks driving rebar into the mud and plopping a square on, and others using an elevated GCP setup with PVC pipe to keep the square high and visible. I’ll be working in areas with very dense, low sitting vegetation with twice-daily high tides. Any thoughts or anecdotes would be appreciated. Thanks.
We use elevated gcps. A couple of things to ensure is the visibility of the target and the size. You will want to have at least five images of the target and have it at least a 0.65m (2ft) square. If it is smaller than that photogrammetry will round the area and you might not get a good level surface for the point. We use a 2x4 with a piece of plywood in top. Paint the perimeter of the plywood and an X.
2 Likes
Thanks for the response. Do you ever have issues with warping using the plywood as your GCP surface?
Only if you are trying to use it over an extended period of time. We use half-inch. The lifespan is obviously subject to the weather conditions. You could go with something like formica or a sheet of plastic, but you have to make sure it’s thick enough not to bow. Or just occasionally replace the plywood.
1 Like
We have used plastic chevrons with rebar at the tip. We make them out of strips cut from a sheet of white plastic and use black markers to number them. A screw holds 2 strips together at one end and makes the strips easier to transport through the dense vegetation since they can fold. Once we get to a destination we unfold and stake the ends. The chevrons and numbers show up really well, and we have been able to leave them for several tide cycles without losing them.
2 Likes
Interesting setup, thanks very much for sharing. Any chance you have any photos you could share for reference?
I am sure we have some. Let me dig around a bit.
All these are good ideas, but I’ve been thinking…
Obviously, it would be hard to determine x, y and z on an elevated target. Could a bipod be elevated to a 2m height, measure point and after measurement place a white 5 gal bucket lid with some kind of visual mark on top of the bipod ? It seems this would be easy except for the mounting of the lid to the top of the pole. Plus, you would need many bipods for the project.
Also, total length of time to PP in high multi-path areas might be to long. Observations would need to be done for all points at one time. 1 hour minimum and use a commercial PP platform.
I’m not a photogrammetrist.
1 Like
I’ve seen examples of folks just putting the receiver itself on top of a checkerboard square mounted on PVC with no bipod or survey pole. I imagine the antenna height would be determined by height from the ground to the receiver as it sits on the checkerboard platform?
2 Likes
We would normally do this with a short rod or just by setting the receiver directly over the target like our permanent base poles. The main thing is having a large enough surface that the point of the shot is modeled correctly. If it’s too small or if your GSD isn’t tight enough it will just round of the shapes. This might even be a good task for a create M2 mount.
Even this 30" manhole was rounded off. We normally wouldn’t shoot this, but it was more for horizontal alignment. It reports the elevation correctly, but what would it have looked like without being a GCP?
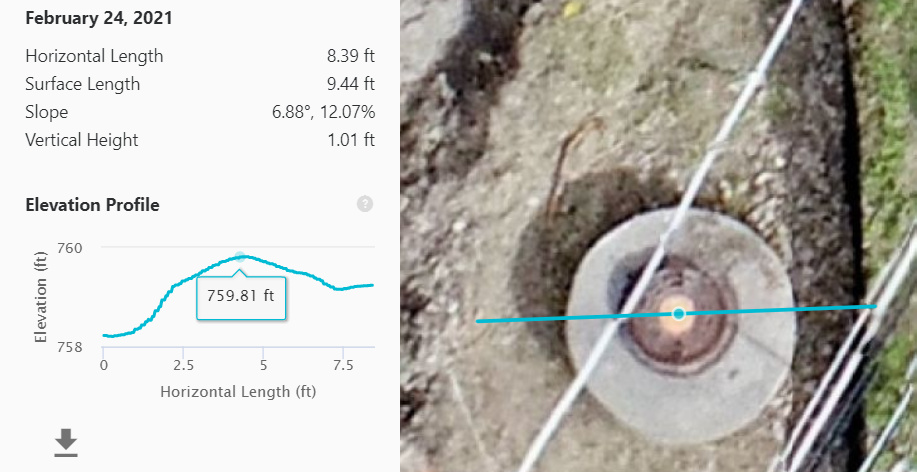
3 Likes
Exactly and remembering to change the antenna height.
1 Like
How do you determine target size ? By altitude and flight area size ? Photogrammetry has always fascinated me. I enjoy surveying photo targets
I think this is just something to be aware of and it is much more important in this kind of a case. We normally use Home Depot bucket lids, but they are on flat ground at least a meter from any kind of grade break. On most flights around 225ft you can clearly see marks that are 2-3" so we use a sharpie to blackout the center of the lid.
2 Likes
This topic was automatically closed 100 days after the last reply. New replies are no longer allowed.