I’m working in a project to study the different ways to control
drones. This is research work to finish my last year in the highschool.
At this moment I control my quad with RC, with RPI2+Navio2+APM Planner2
and a FlySky 6CH. The next step is avoid the RC (virtually) and control
the drone via WiFI … and the last step is using 4G. At this point, I
understand the theory but I have some questions:
1.- I understand that is possible to transfer telemetry & video
over TCP/IP, UDP & gstreamer. But, how can you send the control
parameters to the APM firmware without the RC? Are you using a radio
control attached to the APM Planner 2 to send it?
2.- If you respond “yes” to the last question: How can I send MavLink commands to the APM firmware using TCP/IP connection?
Thanks
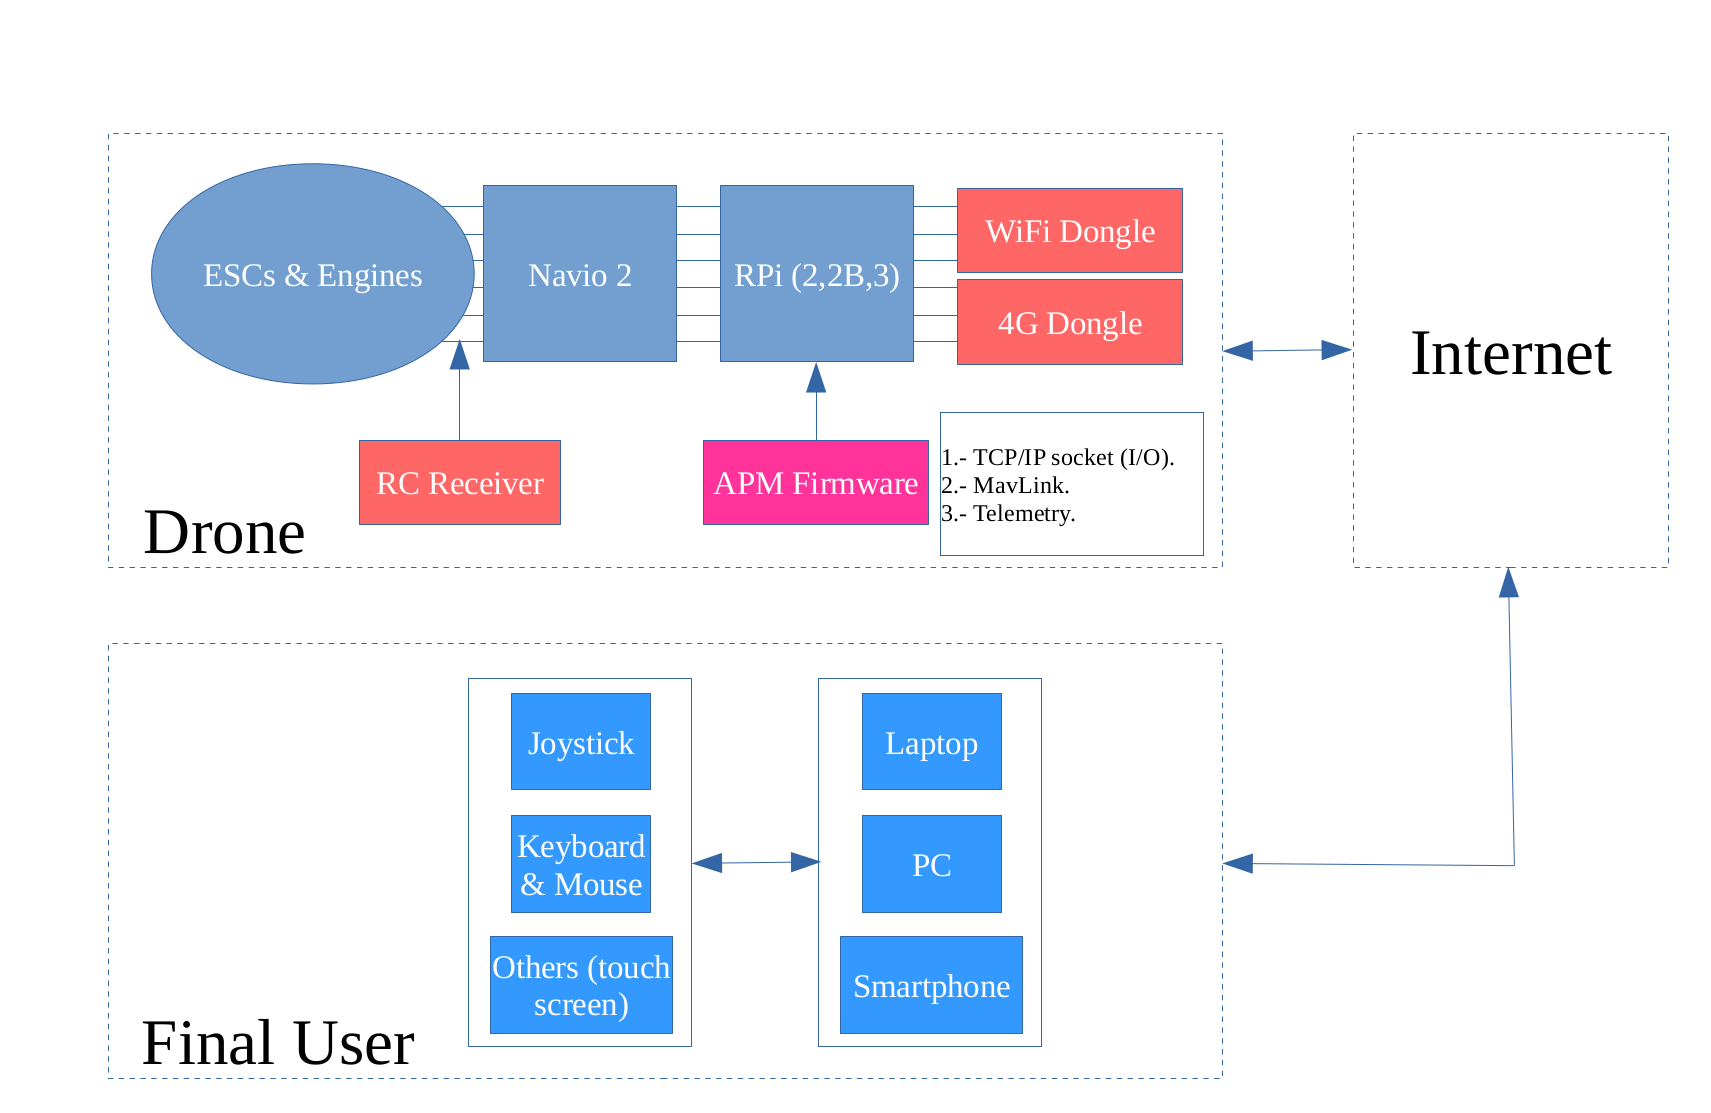
Yes, I’m working in this direction but I still have some critical points to understand. Well, perhaps I explain it more accurately with an image :
And my questions are:
1.- Do the APM firmware that emlid has created for the RPI+Navio2 have a TCP/IP socket open with I/O capabilities?.
2.- If “yes” … what is the port and address (if it needed).
3.- What is the “dialect” (of MavLink) that the firmware is using?
Thanks a lot
There’s no fixed port, but you can specify it by yourself when running ArduPilot like shown in our docs. It can be UDP or TCP.
Ardupilot dialect is used, it is specified in ardupilot code.
Hello,
I’m making some tests with this. I have some questions:
1.- I connect with the RPi remotely using ssh from my PC with IP 10.1.0.15. The IP address of the wifi dongle is 10.1.0.25 in the RPi. When I’m logged in the RPi I execute: # sudo ArduCopter-quad -A tcp:10.1.0.15:14550.
This is that you say in the docs: “Where 192.168.1.2 is the IP address of the device with the Ground Control Station - your laptop, smartphone etc.”
2.- I created a simple code in python to connect with the remote socket, here is:
#!/usr/bin/env python
import socket
TCP_IP = '10.1.0.25’
TCP_PORT = 14550
BUFFER_SIZE = 1024
MESSAGE = "Hello, World!"
s = socket.socket(socket.AF_INET, socket.SOCK_STREAM)
s.connect((TCP_IP, TCP_PORT))
print "Waitting …"
data = s.recv(BUFFER_SIZE)
s.close()
print “received data:”, data
I write in the first test the IP of the RPi … the result: socket.error: [Errno 111] Connection refused
in the second test I write the IP of my PC: the same error. Finally I write this in the arducopter command: # sudo ArduCopter-quad -A tcp:10.1.0.25:14550. The IP of the wifi dongle in the RPi2. In the python I write the same IP, 10.1.0.25 … And then it works, this is the output:
Waitting …
received data:
Init APM:Copter V3.4-rc1 (dfa90d29)
Free RAM: 262144
FW Ver: 120
load_all took 135us
0 0 0 DataFlash_File: buffer size=16384
� Q}�AK8963: Onboard compass detected
LSM9DS1: Onboard compass detected
HMC5843: Could not detect version
HMC5843: External compass not detected
� Q��Init Gyro*� Q�
O.K. I can read the socket buffer from the firmware remotely … That’s right. Now I want to send commands to the firmware using the same channel.
Is this the normal behaviour?
You are confusing instructions for UDP and TCP.
If you use UDP, you have to enter the IP address of the telemetry target (your GCS computer) after the
-A option. APM sends out the telemetry to that IP and does not care about if it is received or not.
TCP uses a client/server model, so you enter the IP of the interface you want to have APM listening for connections
Or you simply enter -A tcp:0.0.0.0:port.
Choose a port and APM will listen for connections on any IP, any device. In your GCS/python script you then enter the IP:port of the RPi.
This is very useful, if you change networks (home wifi, smartphone hotspot, etc) or you have multiple network interfaces on your RPi.
2 Likes
Hi Sebastian,
I agree with you. The best way is use the option: -A tcp:0.0.0.0:port.
Now, when I am using the APM Planner 2, I use a new TCP link connection with the IP address of the RPI2.
On the other hand, I tested the DroneKit Python wrapper, and I launched the examples (vehicle_status and simple_goto) remotely. I write it like this: # python ./simple_goto.py --connect tcp:10.1.0.25:14550.
The drone responded well to the remote commands (without propellers …).
I suppose that this is the correct way to make my research project.
Regards.
Hi Sebastin,
I am facing an issue with connection over TCP IP. I am using remot3.it to get the TCP IP address and the port from the Navio+ . (i am connecting over 4G network)
But on the " /etc/default/arducopter" settings. I have setting TELEM1 with the
TELEM1=“-A tcp:proxy50.rt3.io:37495” and provided the same IP address and post on the Mission Planner.
They do not connect and it times out.
Can you please help ?
Thanks
It is been a while since I last used remot3.it, but I think you got a few things wrong:
-
If I remember correctly, Ardupilot only accepts IP adresses as telemetry entries, not urls.
-
You do not need to make Arducopter talk directly to remot3.it proxies, you must install the raspberry pi client with “sudo apt-get install weavedconnectd” and configure it to connect to Arducopter. The client then handles the communication with remot3.it.
Here is the link to the howto:
https://remot3it.zendesk.com/hc/en-us/articles/115006015367-Installing-the-remot3-it-weavedconnectd-daemon-on-your-Raspberry-Pi