Building an Autonomous Car with Rasbperry Pi and Navio2 running Donkey

Originally published at: https://emlid.com/building-autonomous-car-rpi-navio2-running-donkey/


Background

Autonomous cars is an application of Artificial Intelligence that is gaining a lot of interest lately - from auto manufacturers, research institutions and universities. The DIY community has recently stepped up their game with open source libraries and software that allow hobbyists to easily build small scale autonomous vehicles. Inspired by such efforts, one of our community users Yannis shares the build of a small scale vehicle powered with Raspberry Pi and Navio2 that can navigate autonomously on a track using monocular vision.

Yannis is a PhD researcher at TU Delft by day, and a U(*)V enthusiast by night. Along with the autonomous car project Yannis has already made project for controlling Wifibroadcast video with an RC Switch using Emlid Raspbian firmware and built holonomic rover with Navio2 and Wifibroadcast. All this projects are well-presented in his blog.
This post provides a high-level overview of the materials, software, and steps to assemble the hardware, configure the software and run the car with a pre-trained “pilot”, based on a Convolutional Neural Network (CNN).

Materials

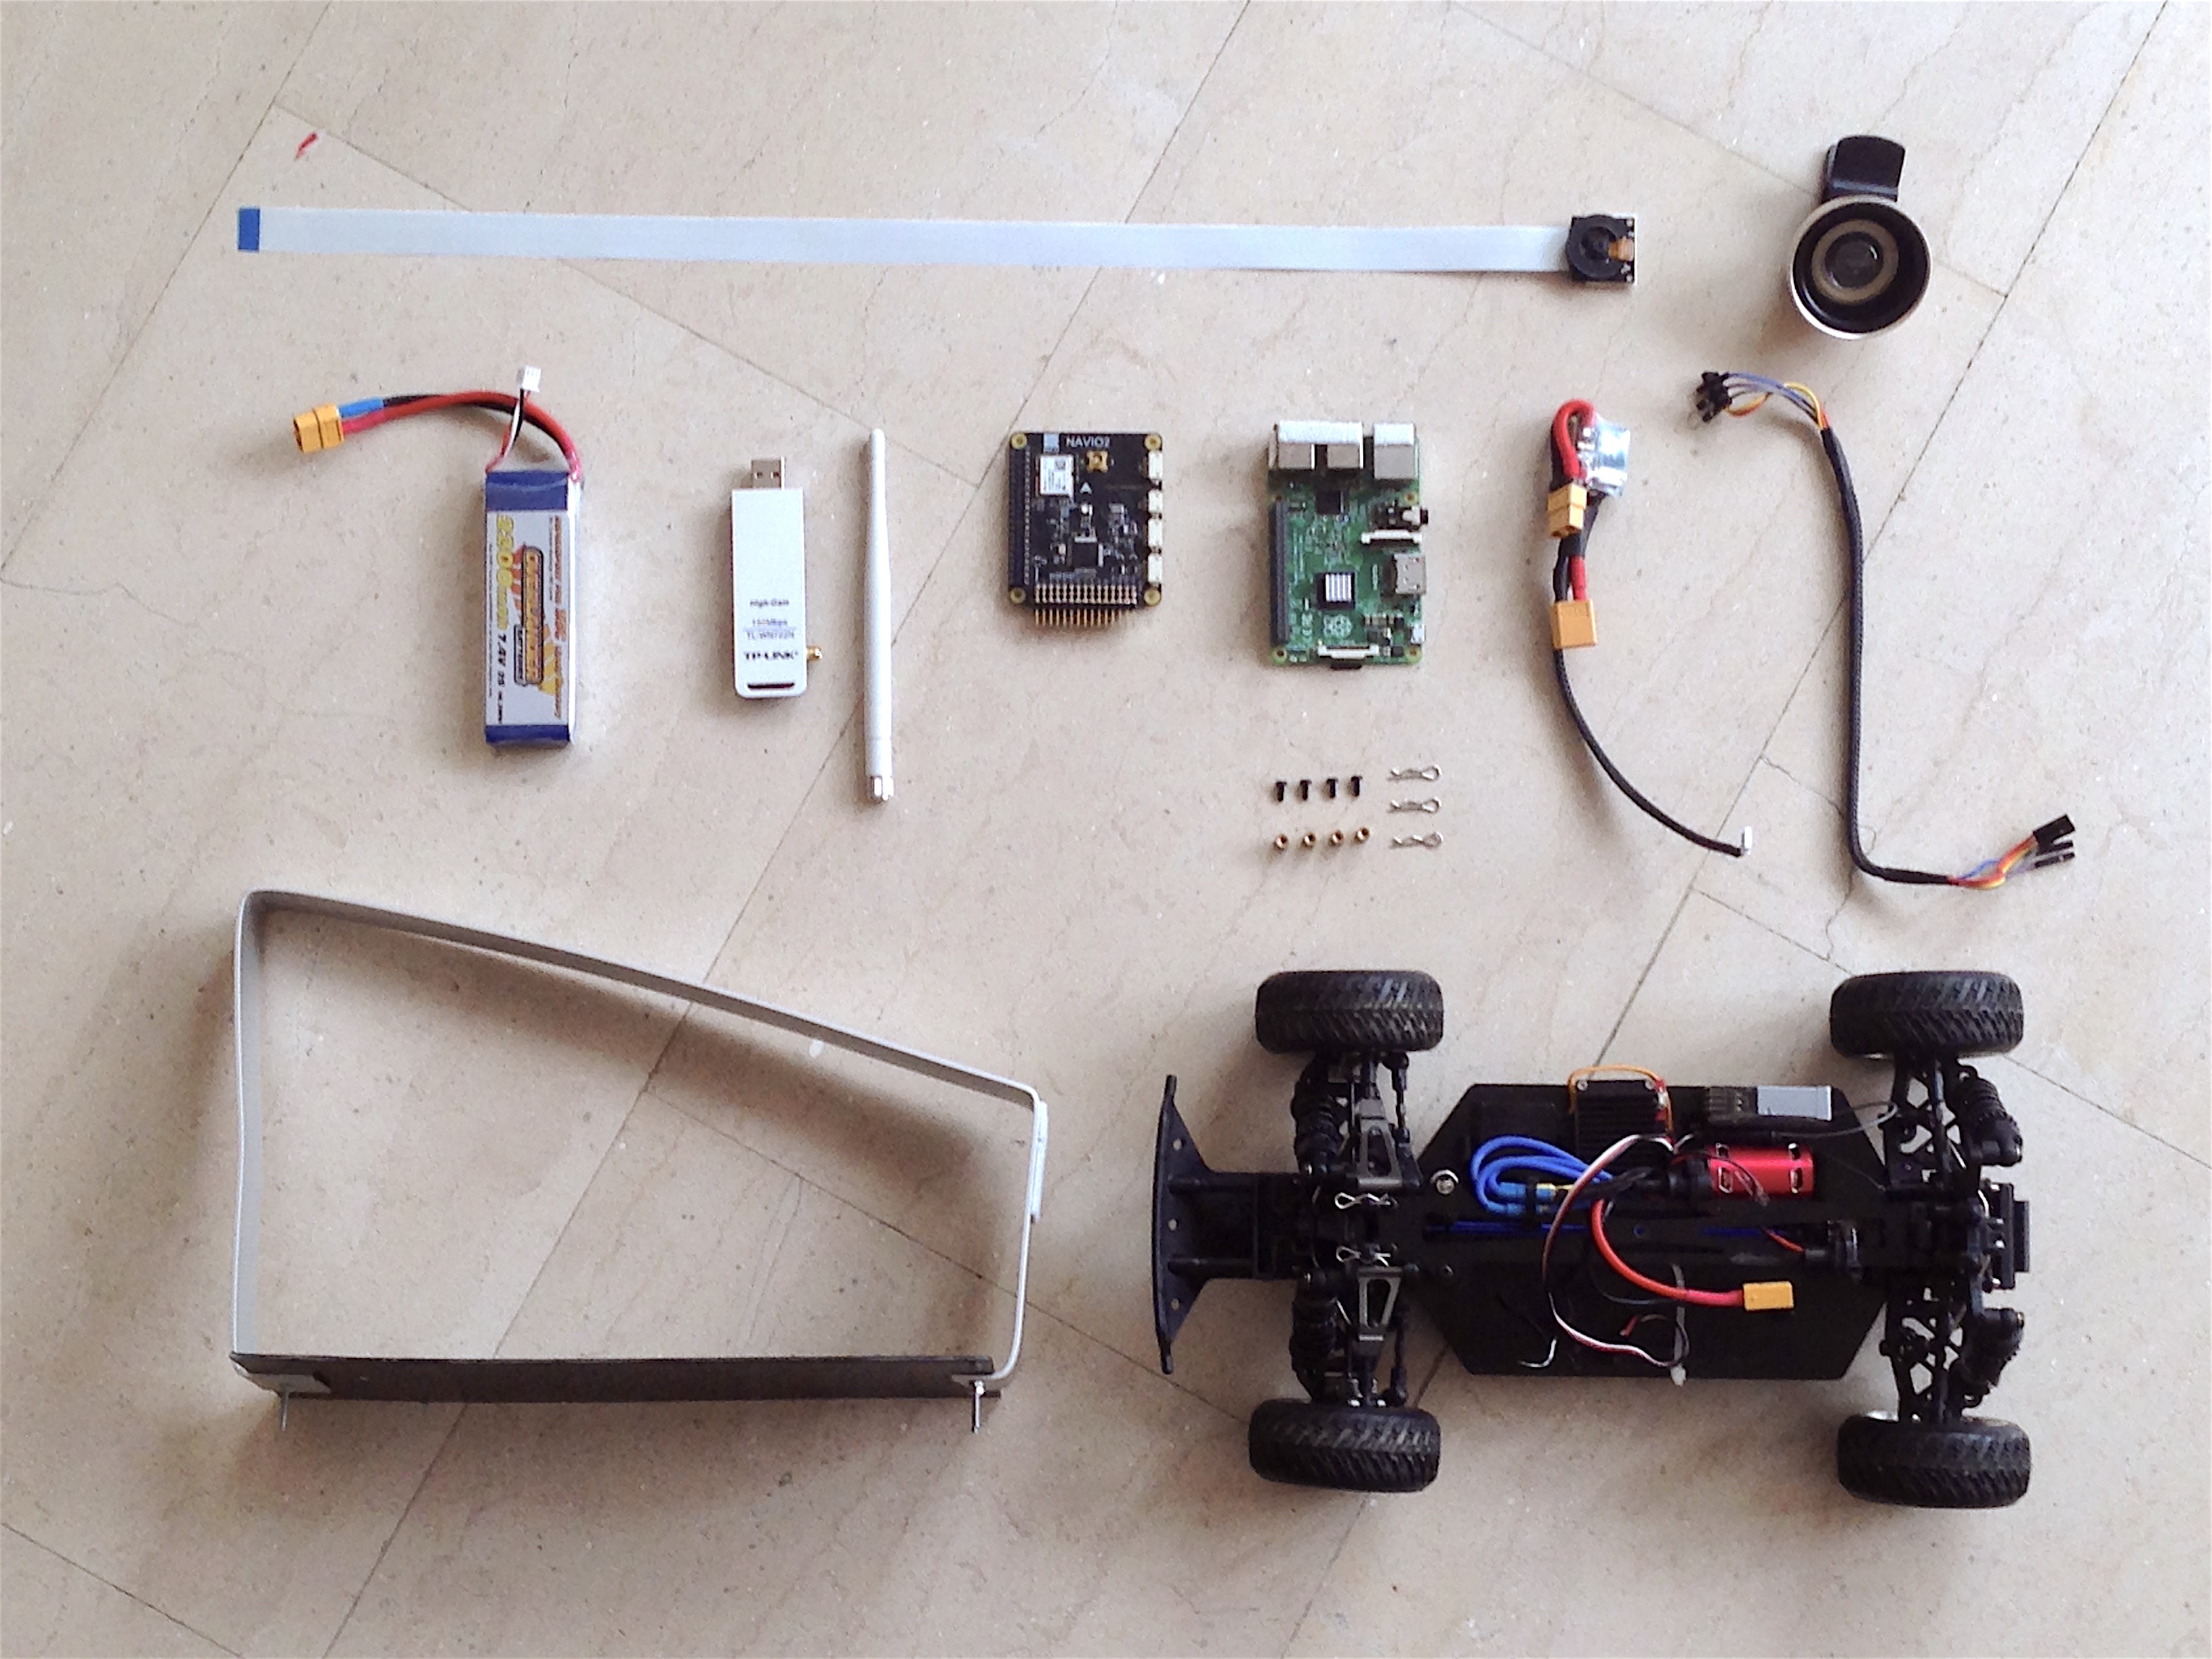
A standard RC car chassis was used as a foundation for building the vehicle. Any 1/16 or 1/10 chassis can be used as long as it has separate ESC and receiver. Any Almost Ready To Run (ARR) cars should be ok. In addition, it is better to get a car with either brushed motor + ESC or sensored brushless motor + ESC (much more expensive). The reason is that in both cases throttle response is much more linear than in the case of a sensorless brushless motor. As a result, the car can move at a relatively low/moderate speed which is required for autonomous operation, as running a CNN onboard a Raspberry Pi can achieve a few tens of FPS at best.
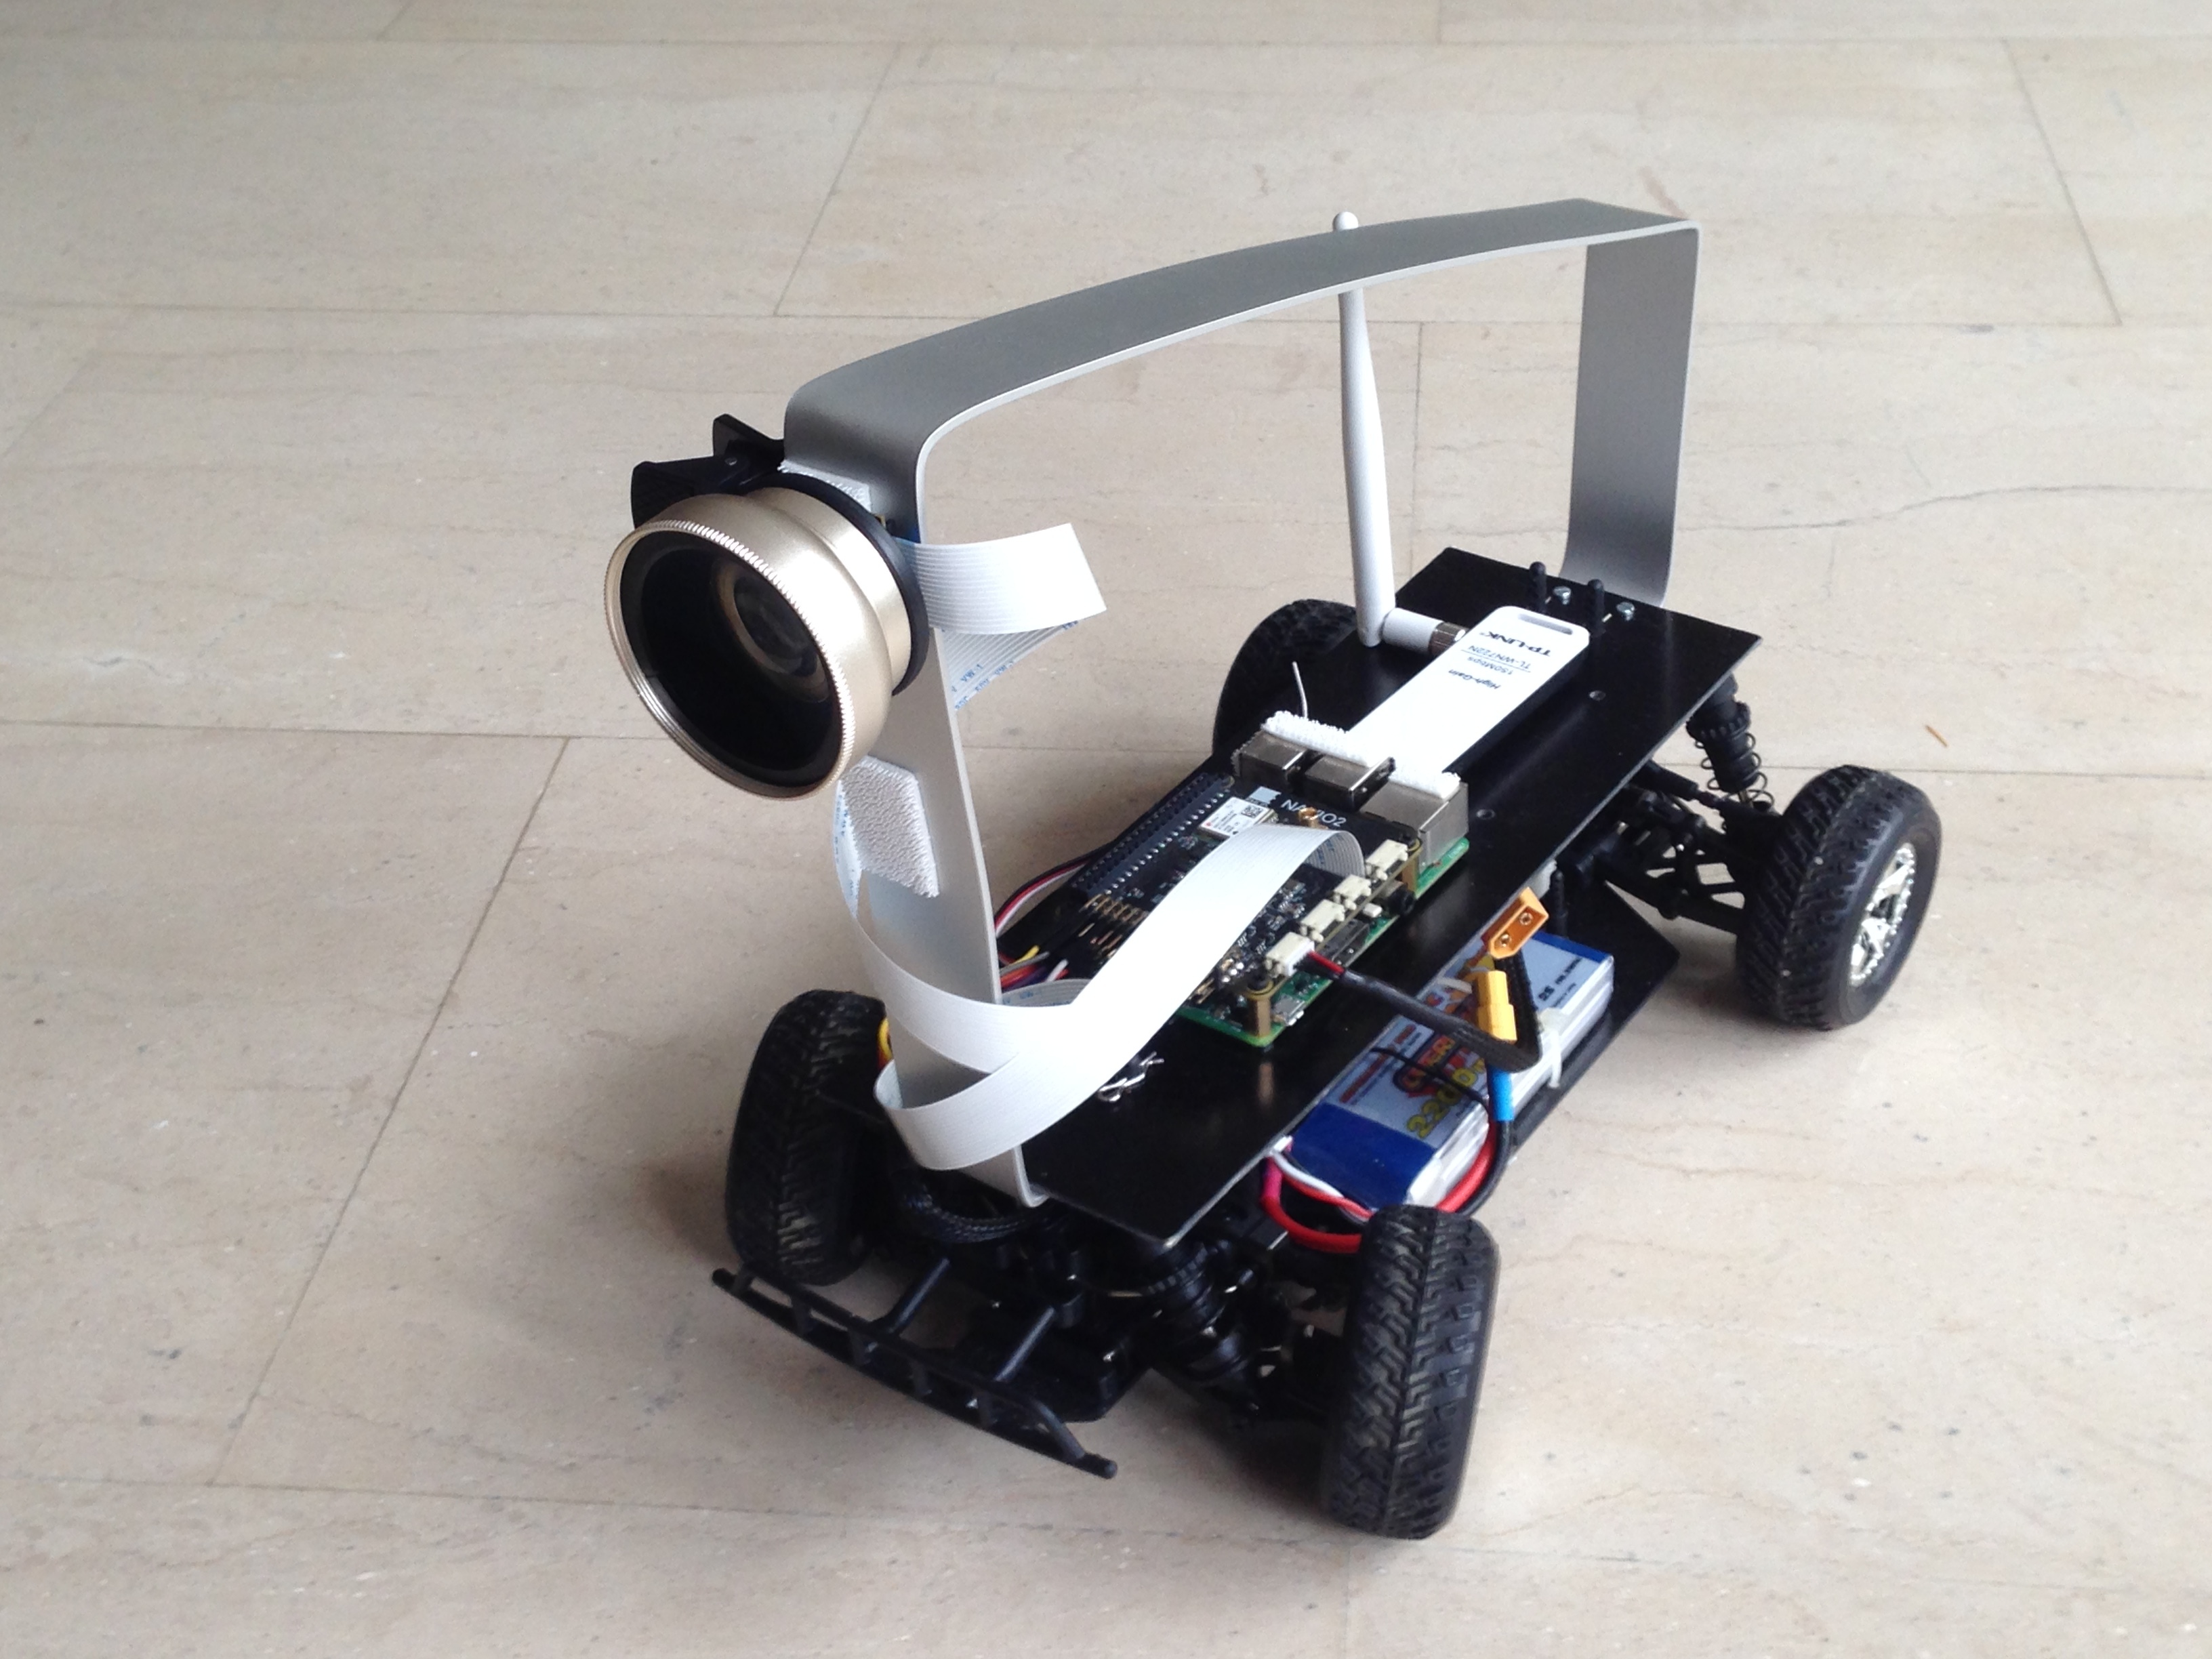
The onboard computer used was a Raspberry Pi 2 (but it could be a Raspberry 3 as well, of course). To control the motor and servo, a NAVIO2 hat was used. The NAVIO2 was chosen as it has good support for hardware PWM, but it also comes with a suite of functionality that is always handy, such as hardware RC signal decoding, IMU and power management. Together with an APM power module NAVIO2 has eliminated the need for a second battery. Whats more, the gyroscope in the IMU can help keep those front wheels pointing in the desired direction, regardless of mechanical miscalibration of the steering system, terrain traction and so on. Finally, the onboard GPS could be used to track and then analyze the course of the vehicle, or even for navigation.
For vision the Raspberry Pi Camera was chosen, which works with Raspberry Pi 2 out of the box. The only problem with this camera is that it has a relatively narrow FOV, so some nearby features of the track may be missed. To avoid this, a cellphone add-on lens was strapped in front of the camera. But the standard camera could be replaced with a wide-angle one, as well.
Communication happens through WiFi and RC. WiFi sends and receives telemetry via http (e.g. camera image, steering angle etc), and RC controls the vehicle when in manual mode. RC was chosen as a controller was available and controls are very precise.

Vehicle Assembly

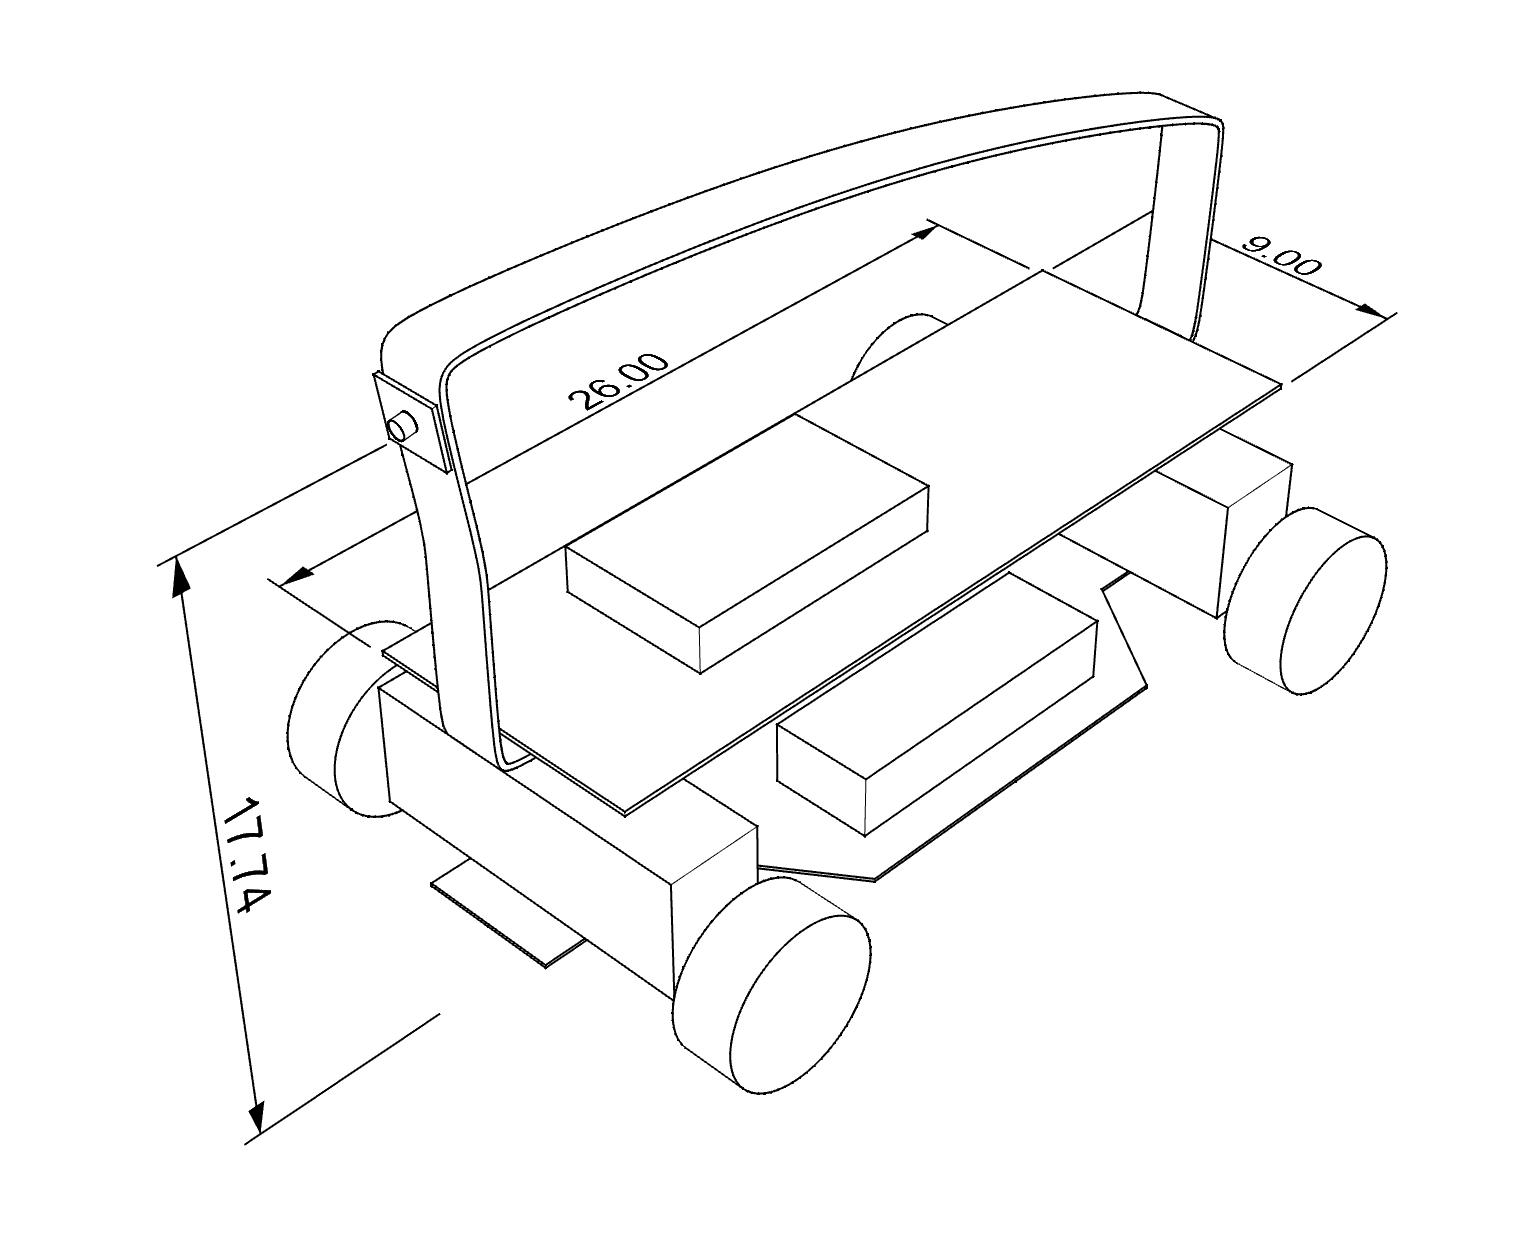
Assembly was rather simple. First, a G10 plate was cut in a rectangle of 9x26cm (WxL), and 6mm holes were drilled for the RC chassis body posts to pass through and act as supports. In addition, holes for securing the Raspberry2+NAVIO2 were drilled with a dremel. Then, a 2mm aluminum sheet was bent to a U-shape, 3mm holes drilled and fixed with bolts on the G10 plate. The sheet serves as a camera mount, a convenient handle to hold the car, and also protection in case the car rolls over. Here’s a CAD drawing with dimensions of the parts:

Software Setup

The software is the most important part of an autonomous vehicle. In vision-based driving and navigation, there are currently two approaches: The established one is based on the use of computer vision to extract features of the image seen and based on those guide the vehicle. For example, some features could come from the direction of the lane dividers on a track. A more recent approach is a machine-learning one, where image processing neural networks, called Convolutional Neural Networks (CNNs), are trained “end-to-end”, using supervised learning. These networks accept a camera picture as input and output steering and throttle values.
For this build, the car runs on a modified version of the Donkey platform. Donkey is open-source self-driving software using CNNs. It is based on tensorflow and keras, two popular neural network libraries. Donkey is developed by Will Roscoe and contributors, and is a relatively new effort but has a vibrant community. For this project, Donkey was modified to bring it closer to the needs of this project (e.g. adding on-board Websocket Server and RC control), but the essence stays the same and the CNN models used by Donkey are compatible. Check out UnmannedBuild blog for modified version of Donkey, it will be released soon!

Driving!

The setup has been tested currently once on a sidewalk with dark texture and white lines (thus resembling a track, slightly), using the default Donkey CNN model. The results are quite satisfactory, given limitations of the camera lens and the difference in texture of the track. Here’s a video of the car:

This post went over the design, build and test of an autonomous RC car, using monocular vision and machine learning. In his project, Yannis enabled a self driving library and control platform for use with Navio2, so developers and enthusiasts can take an advantage from both: Donkey software and the autopilot HAT sensors. This will allow to broaden the range of applications of a small scale DIY vehicles.

Follow Unmanned Build blog to see more projects and builds from Yannis!

2 Likes

In case someone missed, here’s the Software part of the project from Unmannedbuild blog by @yconst:

In the previous post I’ve outlined the hardware build of a “Robocar”, a simple autonomous car platform using monocular vision and Deep Learning, using a small RC car with few modifications. The post focused exclusively on the hardware. If you’ve followed the directions in that post, you should be able to customize your RC car with a simple wooden or plastic platform, a Raspberry Pi, a camera and a PWM HAT1 that can control a motor and a servo. For my build I’ve also added an RC receiver, since my NAVIO2 HAT supports decoding of SBUS and PPM signals out of the box. However this is optional, and there are many ways to control your car, depending on what you have available (WiFi, for instance).

Even though the hardware is essential to a functioning autonomous robocar, at it’s heart it’s the software and the algorithms that enable autonomy. In this post we will be focusing on building a simple software stack on the Raspberry Pi that can control the steering of an autonomous vehicle using a Convolutional Neural Network (CNN).

Background and Aims

Let us elaborate on the background and our goals a bit. As mentioned earlier, the aim of this project is to build a car that can navigate itself around a course, using vision and vision alone. Not only that, but decision making regarding steering and throttle all happen as part of a single CNN, which takes the image as input and outputs values corresponding to steering and throttle2. This type of decision-making known in machine learning as an “end-to-end” approach: Information comes in raw at the input, and the desired value is presented at the output. The neural network needs to infer suitable decision making procedures as part of it;s training. End-to-end training is just one of a number of different approaches for autononous vehicles. Another popular one is the so-called “robotics” approach, where a suite of different sensors (vision included) are “fused” together algorithmically to produce a map of the vehicle surroundings and localize the vehicle within it. Then, decision making takes place as a separate step, and sometimes consists of hand-coded conditions and actions.

It is not the place in this blog post to debate the merits of one approach vs the other. The truth may lie in a compositional approach, for all we know 3 Taking into account, however, the simplicity of this project and it’s DIY roots, as well as the recent leaps in self driving vehicles achieved by end-to-end neural net approaches, I feel it’s worth a try. And so did quite a few people, including the Donkey team, whose default CNN model and pieces of code we’ll be using in this build.

Installation

This car build uses the Burro autonomous RC car software, freely available on Github. Burro is an adaptation of Donkey for the NAVIO2 HAT. While it borrows a lot of features from Donkey, Burro has a number of significant differences:

There is no separare server instance, all telemetry is served by an onboard web socket server
RC(SBUS) or gamepad (Logitech F710) are used for control of the car
It is adapted for use with (and requires) the NAVIO2 board’s RC decoder, PWM generator and IMU (gyroscope)
Currently Burro requires a Raspberry 2 or 3 board with the NAVIO2 HAT. Before proceeding with the installation of Burro, you will need to have a working EMLID image installation. The latest version is strongly recommended. Please make sure you follow the instructions available in the relevant EMLID docs.

Once this is complete, ssh to your Rpi, which by default should be navio.local, if using the EMLID image.

ssh pi@navio.local

wget the Burro install script

wget https://raw.githubusercontent.com/yconst/burro/master/install-burro.sh

change permissions and run it

chmod +x install-burro.sh
./install-burro.sh

This will install all required libraries, create a virtual environment, clone the Burro repo and set it up, and create symlinks for you. After successful completion, you end up with a fully working installation.

A warning: Some steps of this script can take a significant amount of time, especially the numpy pip install step, which needs to happen due to library incompatibility with the apt-get versions. Total installation time should be around 30min. To ensure that your installation is not interrupted midway, make sure that you run your Pi out of either a power supply that can supply at least 5V/2A, or a fully charged power bank or LiPo of sufficient capacity.

Configuring

I am using the software with a Turnigy mini-trooper 1/16 RC car. If you have the same car, you need only change your RC channels if necessary. RC Input channels are as follows: 0 – Yaw (i.e. steering), 2 – Throttle, 4 – Arm. Yaw and throttle are configurable via config.py, but Arm is hardwired to ch. 4. Each time the RC controller is armed, a neutral point calibration is performed. Thus, you only need to make sure that your sticks are center before arming the car.

By default Burro outputs throttle on channel 2 of the NAVIO2 rail, and steering on channel 0. You may wish to change this.

You may also wish to configure the throttle threshold value above which images are recorded.

See the Readme in the Burro repo for more instructions on how to edit your configuration.

Testing

After installation and configuration is complete, you should be able to drive your car around, either using the manual controls, or using a mix of CNN for steering and manual controls for throttle. Automatic throttle control is not yet available, but it will be in a future version.

To start a Burro instance, first ssh to your RPi, if you havent done already:

ssh pi@navio.local

Then type following, from the place where your install-burro.sh script was located:

```bash
cd burro/burro
sudo ./start.sh

Drive it!

Point your browser to your RPi address (http://navio.local by default for the EMLID image), the telemetry interface will come up. Choose your driving mode based on your controller. The default is using the F710 gamepad for steering and throttle. There are options for RC, gamepad, and mixed RC+CNN and gamepad+CNN driving, where the CNN controls the steering and you control the throttle. Autonomous throttle control is not yet implemented in Burro.

Next Steps

I like to think the Burro project as being part of the lively Donkey community, since it has been spun out of Donkey after all. As such it is worth taking a look at many resources created by the Donkey developers, namely:

If you’re interested in the development of autonomous small scale vehicles, you may wish to be part of the Slack community of Donkey, by requesting an invite.

Conclusion

This is the second post in a series discussing the software aspects of a small scale autonomous vehicle, using vision alone and end-to-end machine learning for control and navigation. The Burro software was briefly presented, together with installation instructions.

Autonomous vehicles is a very young and promising field of AI, and certainly we will be seeing very interesting competition in the near future.

3 Likes

Thanks to EMLID, @dmitriy.ershov and @igor.vereninov for sharing this both on the forums as well as on the EMLID blog. NAVIO has been instrumental in setting up the rover easily, although I’ve used it in the past only on quadcopters.

I just want to jump in and say that if anyone from the community has any questions on the project, wish to build an autonomous car of their own or are just curious, you are very welcome to post here and I’d be glad to answer, to the extent that I can. Also keep an eye on my blog for updates on the project.

Yannis

4 Likes

Hi all,

Here a short update on this project: First indoor drive without track markings is a success:

Read more about it here

I’m using Raspberry Pi 2, NAVIO2, a wide-angle camera and a multicopter outrunner to drive the car!

2 Likes

Hi all,

Yet another update on this project: Thanks to the contribution of github member @adricl, Burro now also supports NAVIO+, in addition to NAVIO2. Hardware is autodetected by the Pyhton program on startup.

Best,
Yannis

2 Likes

Wow, fantastic effort.
I have a requirement to do similar but with one key variations

I need to get my robot from point A to point B call it 40 meters apart outdoors.

  • like your example there are no obvious lines to follow
  • based on 2 GPS locations point A and point B.

is there a pre existing piece of code that will help me train by repetition manually driving from point A to point B and back again enough times to get some quality CNN images. Then program to send from A to B and B to A on a schedule ?

Hello All, I love this Burro and Donkey project, I hope I can contribute someday. I have my donkey car working, I use a different SD card for my Burro. My Burro uses the Emlid image.

I’m having a challenge with my Burro

I have docopt installed, but…

$ ./start.sh
Traceback (most recent call last):
File “/home/pi/burro/burro/burro/drive.py”, line 16, in
from docopt import docopt
ImportError: No module named docopt

Can anyone help me get to the next step please?

Oh so close, but yet so far…

Looks like the current stock image from emlid needed to be expanded…got it working.

[still waiting on my Sony Sixaxis controller for Donkey, meanwhile…] Control a Burro car using the F710 Gamepad · yconst/burro Wiki · GitHub

I got this working with Burro (Logitech F710) but no throttle any ideas?

Hi @hitekmike, do you have your gamepad on X mode? Also maybe check out the wiki for some information on how to control the car with a F710.

Hi @morgan,

This would be possible if you had enough data for the path. I’ve managed to get a Burro-based car going indoors without track markings and partial success outdoor in a garden.

Normally this would involve you driving the car through the path. I am not aware of any script that could do this for you automatically.

Thanks for your reply Yannis

I believe I did have it in X mode, I am trying it again…but right now I have another challenge: ???

2018-03-11 10:11:52,778 - PiVideoStream loaded… .warming camera
/home/pi/burro/local/lib/python2.7/site-packages/picamera/encoders.py:545: PiCameraResolutionRounded: frame size rounded up from 160x120 to 160x128
width, height, fwidth, fheight)))
Exception in thread Thread-3:
Traceback (most recent call last):
File “/usr/lib/python2.7/threading.py”, line 801, in __bootstrap_inner
self.run()
File “/usr/lib/python2.7/threading.py”, line 754, in run
self.__target(*self.__args, **self.__kwargs)
File “/home/pi/burro/burro/burro/sensors/cameras.py”, line 95, in update
self.rawCapture, format=“rgb”, use_video_port=True):
File “/home/pi/burro/local/lib/python2.7/site-packages/picamera/camera.py”, line 1625, in capture_continuous
camera_port, output_port = self._get_ports(use_video_port, splitter_port)
File “/home/pi/burro/local/lib/python2.7/site-packages/picamera/camera.py”, line 545, in _get_ports
’The camera is already using port %d ’ % splitter_port)
PiCameraAlreadyRecording: The camera is already using port 0

Any ideas?

Also, it looks like with the Logitech F710 you do not need to Arm the Burro?

I did review everything in the Wiki, I would be happy to make some suggestions to improve it…

I did get further along, I just ignored the error as in a previous post recommendation.

But, I still cannot get throttle. I am able to steer with S, but right away it turns off my ESC. (I turn on the ESC prior to ./start.sh)

Help?

Yea just ignore the camera error it doesn’t seem to affect anything.

I’m not sure what you mean by turning off the ESC… Do you have power to your ESC?

Also, if you switch channels on your NAVIO can you control the steering with throttle?

(Yes there is power to the ESC…)

I have a XL5 ESC on my Traxxas Slash

You have to press the button on the ESC to turn it on

When I ./start.sh, then move the joystick for Throttle it shuts off the ESC

Switching channels does not make a difference. I can control the steering after alternating the channels though.

I suspect it is some PWM value that the ESC does not like