Originally published at: https://emlid.com/building-autonomous-car-rpi-navio2-running-donkey/
Background
Autonomous cars is an application of Artificial Intelligence that is gaining a lot of interest lately - from auto manufacturers, research institutions and universities. The DIY community has recently stepped up their game with open source libraries and software that allow hobbyists to easily build small scale autonomous vehicles. Inspired by such efforts, one of our community users Yannis shares the build of a small scale vehicle powered with Raspberry Pi and Navio2 that can navigate autonomously on a track using monocular vision.
Yannis is a PhD researcher at TU Delft by day, and a U(*)V enthusiast by night. Along with the autonomous car project Yannis has already made project for controlling Wifibroadcast video with an RC Switch using Emlid Raspbian firmware and built holonomic rover with Navio2 and Wifibroadcast. All this projects are well-presented in his blog.
This post provides a high-level overview of the materials, software, and steps to assemble the hardware, configure the software and run the car with a pre-trained “pilot”, based on a Convolutional Neural Network (CNN).
Materials
A standard RC car chassis was used as a foundation for building the vehicle. Any 1/16 or 1/10 chassis can be used as long as it has separate ESC and receiver. Any Almost Ready To Run (ARR) cars should be ok. In addition, it is better to get a car with either brushed motor + ESC or sensored brushless motor + ESC (much more expensive). The reason is that in both cases throttle response is much more linear than in the case of a sensorless brushless motor. As a result, the car can move at a relatively low/moderate speed which is required for autonomous operation, as running a CNN onboard a Raspberry Pi can achieve a few tens of FPS at best.
The onboard computer used was a Raspberry Pi 2 (but it could be a Raspberry 3 as well, of course). To control the motor and servo, a NAVIO2 hat was used. The NAVIO2 was chosen as it has good support for hardware PWM, but it also comes with a suite of functionality that is always handy, such as hardware RC signal decoding, IMU and power management. Together with an APM power module NAVIO2 has eliminated the need for a second battery. Whats more, the gyroscope in the IMU can help keep those front wheels pointing in the desired direction, regardless of mechanical miscalibration of the steering system, terrain traction and so on. Finally, the onboard GPS could be used to track and then analyze the course of the vehicle, or even for navigation.
For vision the Raspberry Pi Camera was chosen, which works with Raspberry Pi 2 out of the box. The only problem with this camera is that it has a relatively narrow FOV, so some nearby features of the track may be missed. To avoid this, a cellphone add-on lens was strapped in front of the camera. But the standard camera could be replaced with a wide-angle one, as well.
Communication happens through WiFi and RC. WiFi sends and receives telemetry via http (e.g. camera image, steering angle etc), and RC controls the vehicle when in manual mode. RC was chosen as a controller was available and controls are very precise.
Vehicle Assembly
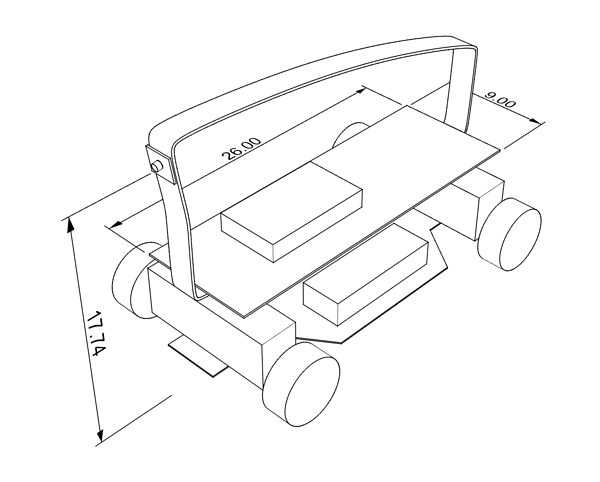
Assembly was rather simple. First, a G10 plate was cut in a rectangle of 9x26cm (WxL), and 6mm holes were drilled for the RC chassis body posts to pass through and act as supports. In addition, holes for securing the Raspberry2+NAVIO2 were drilled with a dremel. Then, a 2mm aluminum sheet was bent to a U-shape, 3mm holes drilled and fixed with bolts on the G10 plate. The sheet serves as a camera mount, a convenient handle to hold the car, and also protection in case the car rolls over. Here’s a CAD drawing with dimensions of the parts:
Software Setup
The software is the most important part of an autonomous vehicle. In vision-based driving and navigation, there are currently two approaches: The established one is based on the use of computer vision to extract features of the image seen and based on those guide the vehicle. For example, some features could come from the direction of the lane dividers on a track. A more recent approach is a machine-learning one, where image processing neural networks, called Convolutional Neural Networks (CNNs), are trained “end-to-end”, using supervised learning. These networks accept a camera picture as input and output steering and throttle values.
For this build, the car runs on a modified version of the Donkey platform. Donkey is open-source self-driving software using CNNs. It is based on tensorflow and keras, two popular neural network libraries. Donkey is developed by Will Roscoe and contributors, and is a relatively new effort but has a vibrant community. For this project, Donkey was modified to bring it closer to the needs of this project (e.g. adding on-board Websocket Server and RC control), but the essence stays the same and the CNN models used by Donkey are compatible. Check out UnmannedBuild blog for modified version of Donkey, it will be released soon!
Driving!
The setup has been tested currently once on a sidewalk with dark texture and white lines (thus resembling a track, slightly), using the default Donkey CNN model. The results are quite satisfactory, given limitations of the camera lens and the difference in texture of the track. Here’s a video of the car:
This post went over the design, build and test of an autonomous RC car, using monocular vision and machine learning. In his project, Yannis enabled a self driving library and control platform for use with Navio2, so developers and enthusiasts can take an advantage from both: Donkey software and the autopilot HAT sensors. This will allow to broaden the range of applications of a small scale DIY vehicles.
Follow Unmanned Build blog to see more projects and builds from Yannis!


